• Skip to primary navigation
  • Skip to main content
  • Skip to primary sidebar

The Polka Dotter

Baking a bit of beauty into every day

  • Home
  • About
  • Recipe Index
  • Food Photography and Styling
  • FAQ
  • Contact

Peanut Butter Brownie Salted Caramel Crunch Cake

June 1, 2017 by Salma 10 Comments

Peanut Butter Brownie Salted Caramel Crunch Cake | The Polka Dotter
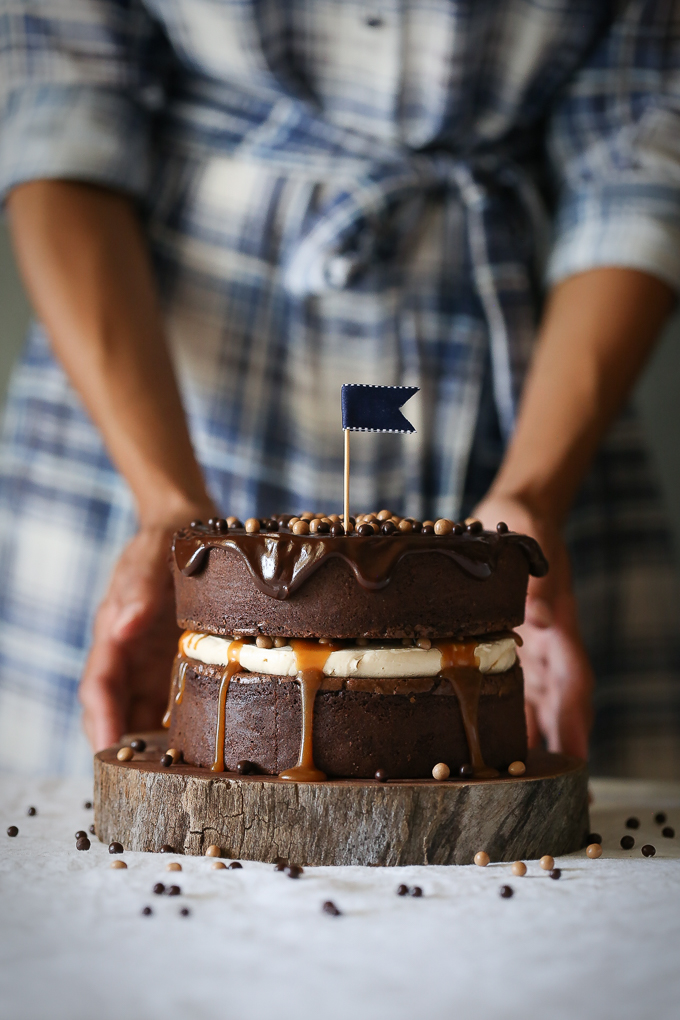
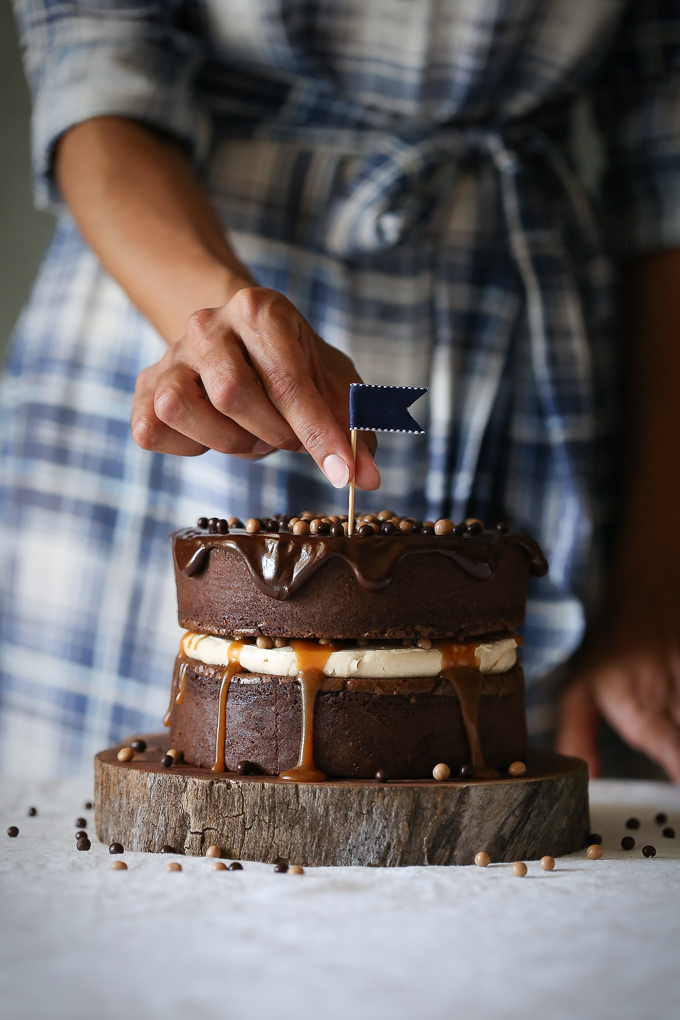
This gorgeous number combines all my favourite guilty pleasures into one very handsome layer cake; where rich dark chocolate brownie is swirled with crunchy peanut butter, layered with velvety smooth salted caramel buttercream and sticky salted caramel sauce, then drizzled with dark chocolate ganache and adorned with luxurious crisp pearls. One little slice and you’ll be in salty, gooey, fudgy heaven.

Baking Notes
(1) If this is your first time making a layer cake or you encounter any problems while making it, I would highly recommend you refer to my post on Layer Cake Basics.

(2) If this is your first time making swiss meringue buttercream or you encounter any problems while making it, I would highly recommend you refer to my post on Swiss Meringue Buttercream Basics.

(3) This recipe incorporates this Salted Caramel Sauce, the most delectable salted caramel sauce you will ever taste. But if you are short on time, you can purchase a good-quality salted caramel from your local speciality food store instead.

(4) I used dark chocolate and salted caramel pearls in this cake to provide a delicious crunch, which can be purchased from stores specialising in top-quality chocolate products. Callebaut and Valrhona both produce these pearls and are comparable in taste and quality. If you are unable to source crunchy pearls, another option to provide a textural complexity would be to substitute with the same quantity of coarsely chopped salted roasted peanuts.

Peanut Butter Brownie Salted Caramel Crunch Cake | The Polka Dotter Peanut Butter Brownie Salted Caramel Crunch Cake | The Polka Dotter Peanut Butter Brownie Salted Caramel Crunch Cake | The Polka Dotter
Peanut Butter Brownie Salted Caramel Crunch Cake
Makes a two layer 15cm (6”) cake
Serves 8-12 people

Ingredients
Peanut Butter Brownie Cake
200g butter
200g good-quality dark chocolate
200g (1 cup, firmly packed) muscavado sugar
160g (2/3 cup) caster sugar
4 large eggs, at room temperature
300g (2 cups) plain flour, sifted
6 tbsp dutch-process cocoa, sifted
1 tsp baking powder, sifted
100g crunchy, salted peanut butter

Salted Caramel Swiss Meringue Buttercram
2 large egg whites
90g caster sugar
125g unsalted butter, at room temperature
1-2 tbsp (20-40ml) Salted Caramel Sauce, to taste

Dark Chocolate Ganache
100g good-quality dark chocolate
2 tbsp pure cream

Decorations
125ml (1/2 cup) Salted Caramel Sauce
10g dark chocolate crunchy pearls (Valrhona or Callebaut)
10g salted caramel crunchy pearls (Valrhona or Callebaut)

Method
Peanut Butter Brownie Cake
(1) Preheat oven to (180°C/160°C fan-forced) and line two 15cm (6”) round baking pans with greaseproof paper.
(2) Melt butter and dark chocolate in small saucepan on low heat until smooth, then set aside to cool for 10 minutes.
(3) Place sugars and eggs in free-standing mixer with paddle attachment and beat until pale and smooth.
(4) Pour melted chocolate and butter mixture into beaten sugar and eggs, and beat until combined.
(5) Add 1/3 of the sifted plain flour and gently beat on low speed to combine, then the rest of the flour, cocoa and baking powder, until mixture is smooth. Take care not to overmix.
(6) Divide mixture between prepared cake pans, weighing each pan to ensure equal weight.
(7) Swirl spoonsfuls of peanut butter throughout the cake (half of the quantity per cake). Bake for approximately 40 minutes or until a cake tester inserted comes out clean. 

Salted Caramel Swiss Meringue Buttercream
(1) Place egg whites and caster sugar in heatproof bowl over small saucepan of simmering water, ensuring the base of the bowl does not touch the water.
(2) Allow the sugar to dissolve, whisking intermittently, heating to 65°C to ensure egg whites are pasteurised.
(3) Allow mixture to cool to room temperature, then whisk in free-standing mixer until white, glossy, soft meringue peaks form.
(4) Very slowly add small 1cm cubes of softened butter, then salted caramel sauce to taste, and continue whisking until buttercream is light and fluffy.

Dark Chocolate Ganache
(1) Gently melt dark chocolate and cream together in a small saucepan on low heat. The ganache should be shiny and thick, and able to be easily spread over the top layer of the cake. Set aside for assembly of the cake.

Assembly
(1) Assembling this cake is easiest when the cake is slightly chilled, the buttercream and salted caramel are at room temperature, and the ganache is slightly warm and fluid.
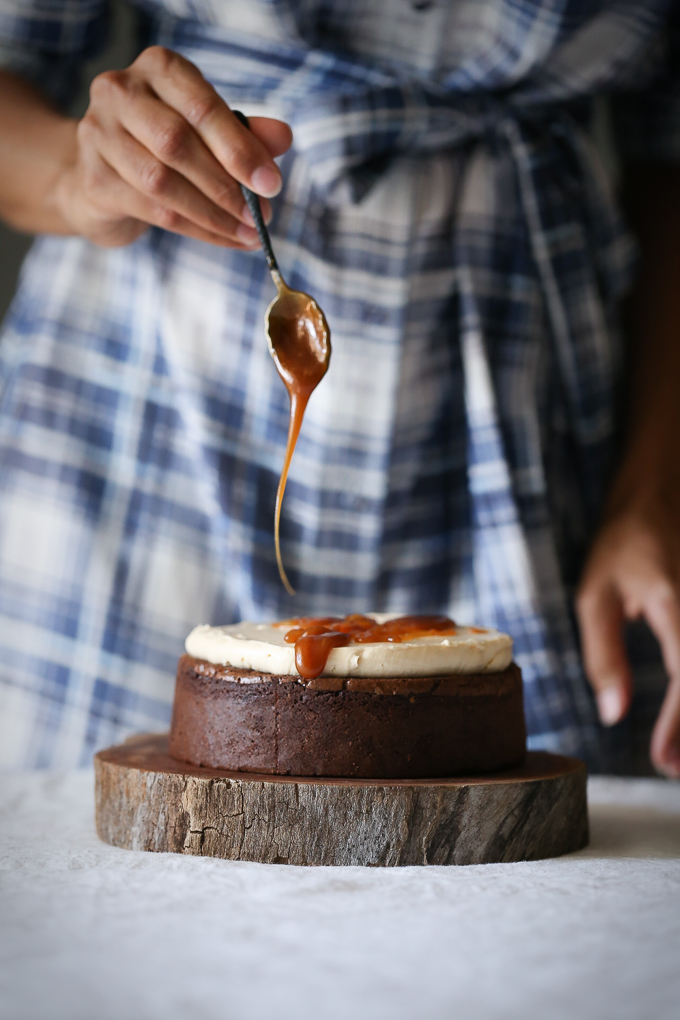
(2) Place the first layer on a round cake plate or turn-table and spread with salted caramel swiss meringue buttercream.
(3) Drizzle with salted caramel sauce, then sprinkle with half the quantity of dark chocolate and salted caramel pearls (or roasted peanuts).
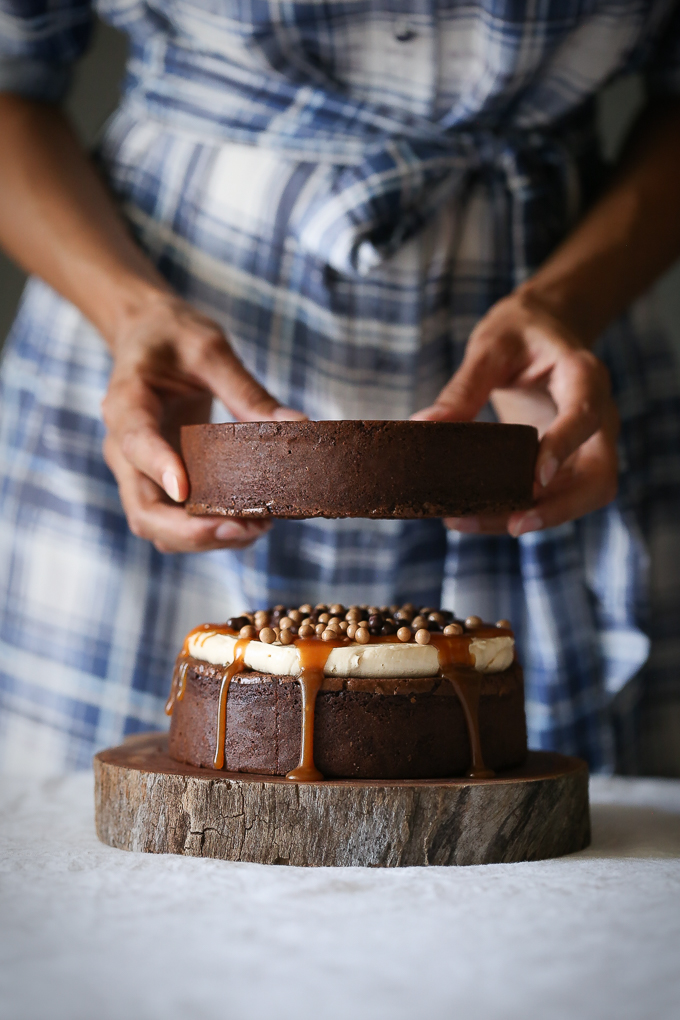
(4) Place the second layer on top, pressing gently and evenly to ensure the layers are stable.
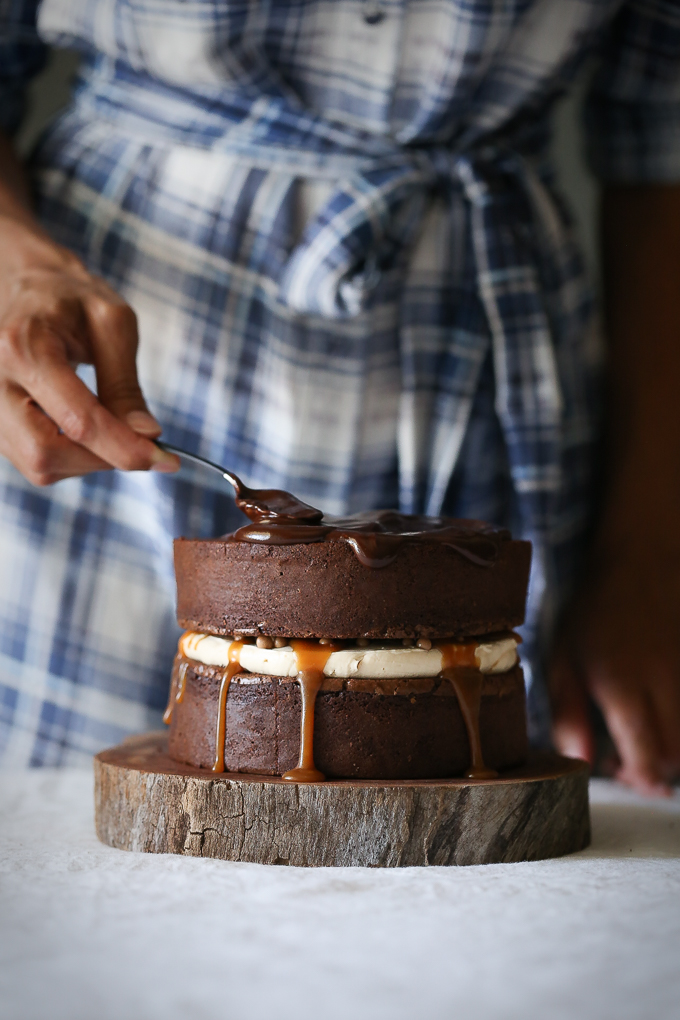
(5) Spread ganache over the surface of the second layer, allowing a little to drip down over the sides. Scatter with remaining pearls or peanuts, and finish with mini ribbon flag or bunting as desired.

Enjoy!

Peanut Butter Brownie Salted Caramel Crunch Cake | The Polka Dotter


Credits and Sources
Brownie cake recipe adapted from Lomelino’s Cakes by Linda Lomelino.
I love using Valrhona and Callebaut chocolate products, however this is not a sponsored post and all opinions stated are my own.

Filed Under: Cakes Tagged With: Chocolate, Peanut Butter, Salted Caramel

Previous Post: « Rose and Blackberry Meringue Stack with Lemon Curd
Next Post: Spiced Maple Apple Pies »

Reader Interactions

Comments

  1. María

    June 4, 2017 at 6:55 pm

    This cake looks amazing! All my guilty pleasures are also combined into this pretty…and one more, but not so guilty…all that classic beauty!!! I’m absolutely in love with your dresses and aprons…Your work takes me to a beautifull fifties dream! Sure I will try this combination of tastes and textures…it looks irresistible… 🙂

    Reply
    • Salma

      June 11, 2017 at 12:47 pm

      Thanks for such lovely comments Maria! I hope you enjoy making and devouring this one, it’s one of my favourites!

      Reply
  2. Solène | In the mood for food

    June 8, 2017 at 8:34 pm

    YUM!! This looks insane! 😍

    Reply
    • Salma

      June 11, 2017 at 12:45 pm

      Thanks so much!

      Reply
  3. Lili @ Travelling oven

    July 1, 2017 at 3:25 am

    What a gorgeous cake! Beautiful photos too as always! 🙂

    Reply
    • Salma

      July 15, 2017 at 12:47 pm

      Hey Lili, thanks for the lovely comments, glad you like it 🙂

      Reply
  4. Becky

    September 4, 2019 at 2:24 pm

    This looks so yummy!! Can you freeze the sponge layers once cooked before assembly?

    Reply
    • Salma

      September 20, 2019 at 11:19 am

      Hi Becky, thanks for your query. Yes you certainly can freeze the layers. I would recommend covering them in a couple of layers of cling film to prevent them drying out, and ensuring they defrost completely prior to assembly and consumption. Happy baking!
      Kind regards, Salma

      Reply
  5. Nicole

    July 16, 2020 at 9:29 am

    Would I need to adjust ingredients for 7” cake pans?

    Reply
    • Salma

      August 24, 2020 at 4:14 pm

      Hi Nicole,
      Thanks for your query and interest in this recipe. You may notice most of my layer cakes on this website tend to be 4 layers – I tend to bake 2 cakes and split each one in half to yield 4 layers. So ordinarily for most of my layers cakes I would have said yes, it would be most ideal to multiply the recipe by 1.5x for best results in obtaining the height of the cake. That being said, given this cake is just 2 layers, you may wish to use the same amount of ingredients for two 7″ cakes, just expect a slighter shorter cake overall when they are layered. If you prefer the height, increase the recipe by 1.5x but you may also wish to bake it at a slightly lower temperature and for longer to ensure it cooks evenly, and cover if needed if it appears to be getting too crispy on the outside.
      All the best and happy baking!
      Kindest,
      Salma

      Reply

Leave a Reply Cancel reply

Your email address will not be published. Required fields are marked *

This site uses Akismet to reduce spam. Learn how your comment data is processed.

Primary Sidebar

Welcome!

Salma Sabdia | Food Photography

Hi, I’m Salma, and I love creating beautiful images and sweet treats. If you’re looking for a little baking inspiration, you’ve come to the right place.

SaveSave

  • Bloglovin
  • Facebook
  • Instagram
  • Pinterest

Instagram

Don’t these flowering gums just take your breath Don’t these flowering gums just take your breath away?

These gorgeous watermelon and fairy floss native blooms stopped me in my tracks a few mornings ago, casually strewn across the path of my morning jog.

Instantly mesmerised by their gorgeous hue, I love how they’ve brightened up a little corner of our home 💕

#australianflora #australianflowers #nativeaustralianplants #floweringgum #corymbiaficifolia #marimekko #marimekkohome #budvases
Studded with honey roasted macadamias, and layered Studded with honey roasted macadamias, and layered with strawberry & lime and mango & passionfruit, this ice cream terrine is a pure Australian summer dream.
⠀⠀⠀⠀⠀⠀⠀⠀⠀
Created for @ausmacadamias, it showcases the native Australian nut in all its glory. Just one of endless possibilities for this delicious nut 😊
⠀⠀⠀⠀⠀⠀⠀⠀⠀
#ad #ausmacadamias #australianmacadamias #macadamias #aussiesummer #summerbaking #holidaybaking #homemadeicecream #foodphotographyandstyling
Those passionfruit curd drips 💕 Find the recip Those passionfruit curd drips 💕

Find the recipe for this White Chocolate Wattleseed Cake + Passionfruit on the blog (link in profile)

Created and shot for @harrisfarmmarkets

#wattleseed #whitechocolatecake #layercake #drizzlecake #passionfruitcurd #summerbaking #holidaybaking #foodphotographyandstyling #harrisfarm
Love the delicious buttery crunch of Australian ma Love the delicious buttery crunch of Australian macadamia nuts in this ice cream terrine, roasted with a hint of honey and ginger, then swirled through vanilla ice cream and layered between summery sorbets of strawberry and lime, and mango and passionfruit. 

I grew up with this native Australian nut, and they’ve always held a special place in my heart (and baking!), so I was absolutely delighted to create this recipe for @ausmacadamias, one of endless possibilities for this delicious nut.

Hands up who wants a bite? Or slice? Or two? 🙋‍♀️

Recipe up now on the blog (link in profile) 😊

#ad #ausmacadamias #australianmacadamias #macadamias #aussiesummer #summerbaking #holidaybaking #homemadeicecream #foodphotographyandstyling
An ode to the simple joy of homemade ice cream in An ode to the simple joy of homemade ice cream in summer, complete with fresh mint from our backyard, handpicked by the kids, infused overnight, and flecked with really really good dark chocolate. There was no doubt this was one of the best ice creams we’ve enjoyed as a family, yet one question remains - is it Mint Choc or Choc Mint? 🍃😂

#homemadeicecream #homemadegelato #minticecream #chocmint #mintchocolate #chocchip #summerbaking #holidaybaking #foodphotographyandstyling #handmadeceramic
Early season figs seem to slowly be making their w Early season figs seem to slowly be making their way into the shops, and I’ve got these brûléed figs on my mind. Perfect served with my Honey Ricotta Cheesecake, you can find the recipe on the blog (link in bio) 😊

#localhoney #honeycheesecake #ricottacheesecake #figcake #cheesecakerecipe #brulee #brûlée #summerbaking #holidaybaking #foodphotographyandstyling
Hello 2023 💕 My favourite cake of 2022 to end Hello 2023 💕

My favourite cake of 2022 to end the year and one of my favourite quotes from Max Ehrmann’s Desiderata to kick off the new one “And whether or not it is clear to you, no doubt the universe is unfolding as it should”.

Wishing you all a beautiful year ahead 😊

Recipe for this divine Blood Orange & Earl Grey Bundt Cake on the blog (link in profile)

#bloodorangecake #earlgreycake #teacake #bundtcake #drizzlecake #summerbaking #holidaybaking #foodphotographyandstyling
Looking for something deliciously simple this summ Looking for something deliciously simple this summer that pairs beautifully with almost any fruit? This Maple Yoghurt Loaf Cake has the perfect crumb thanks to a lovely balance of semolina, almond meal and yoghurt. It’s delicious unfrosted, but I do prefer it as pictured - smothered in maple cream cheese frosting and dotted with summer berries and fresh figs 💕 a favourite from the blog - recipe link in profile 😊

#loafcake #yoghurtcake #figcake #berrycake #summerbaking #holidaybaking #summerfruit #foodphotographyandstyling
Sending all the holiday love 🌟 #holidaylove #g Sending all the holiday love 🌟

#holidaylove #gingerbreadcookies #holidaycookies #festivecookies #christmascookies #cookiegoals #foodphotographyandstyling
Follow @thepolkadotter on Instagram

Latest Blog Posts

strawberry-macadamia-mango-ice-cream-terrine
gingerbread-cookies-with-lemon-icing
macadamia-gingerbread-raspberry-trifle
Blood Orange + Earl Grey Bundt Cake | The Polka Dotter
White Chocolate Wattleseed Cake + Passionfruit Curd | The Polka Dotter
Chocolate Coconut Chai Caramel Cupcakes | The Polka Dotter
Maple Yoghurt Loaf Cake | The Polka Dotter
Honey Ricotta Cheesecake with Bruleed Figs | The Polka Dotter
Blackberry Rose & Lime Mocktails | The Polka Dotter

Copyright © 2023 · Foodie Pro & The Genesis Framework