• Skip to primary navigation
  • Skip to main content
  • Skip to primary sidebar

The Polka Dotter

Baking a bit of beauty into every day

  • Home
  • Recipe Index
  • Portfolio

Chocolate Golden Honeycomb Cake

January 29, 2019 by Salma 8 Comments

Chocolate Golden Honeycomb Cake | The Polka Dotter
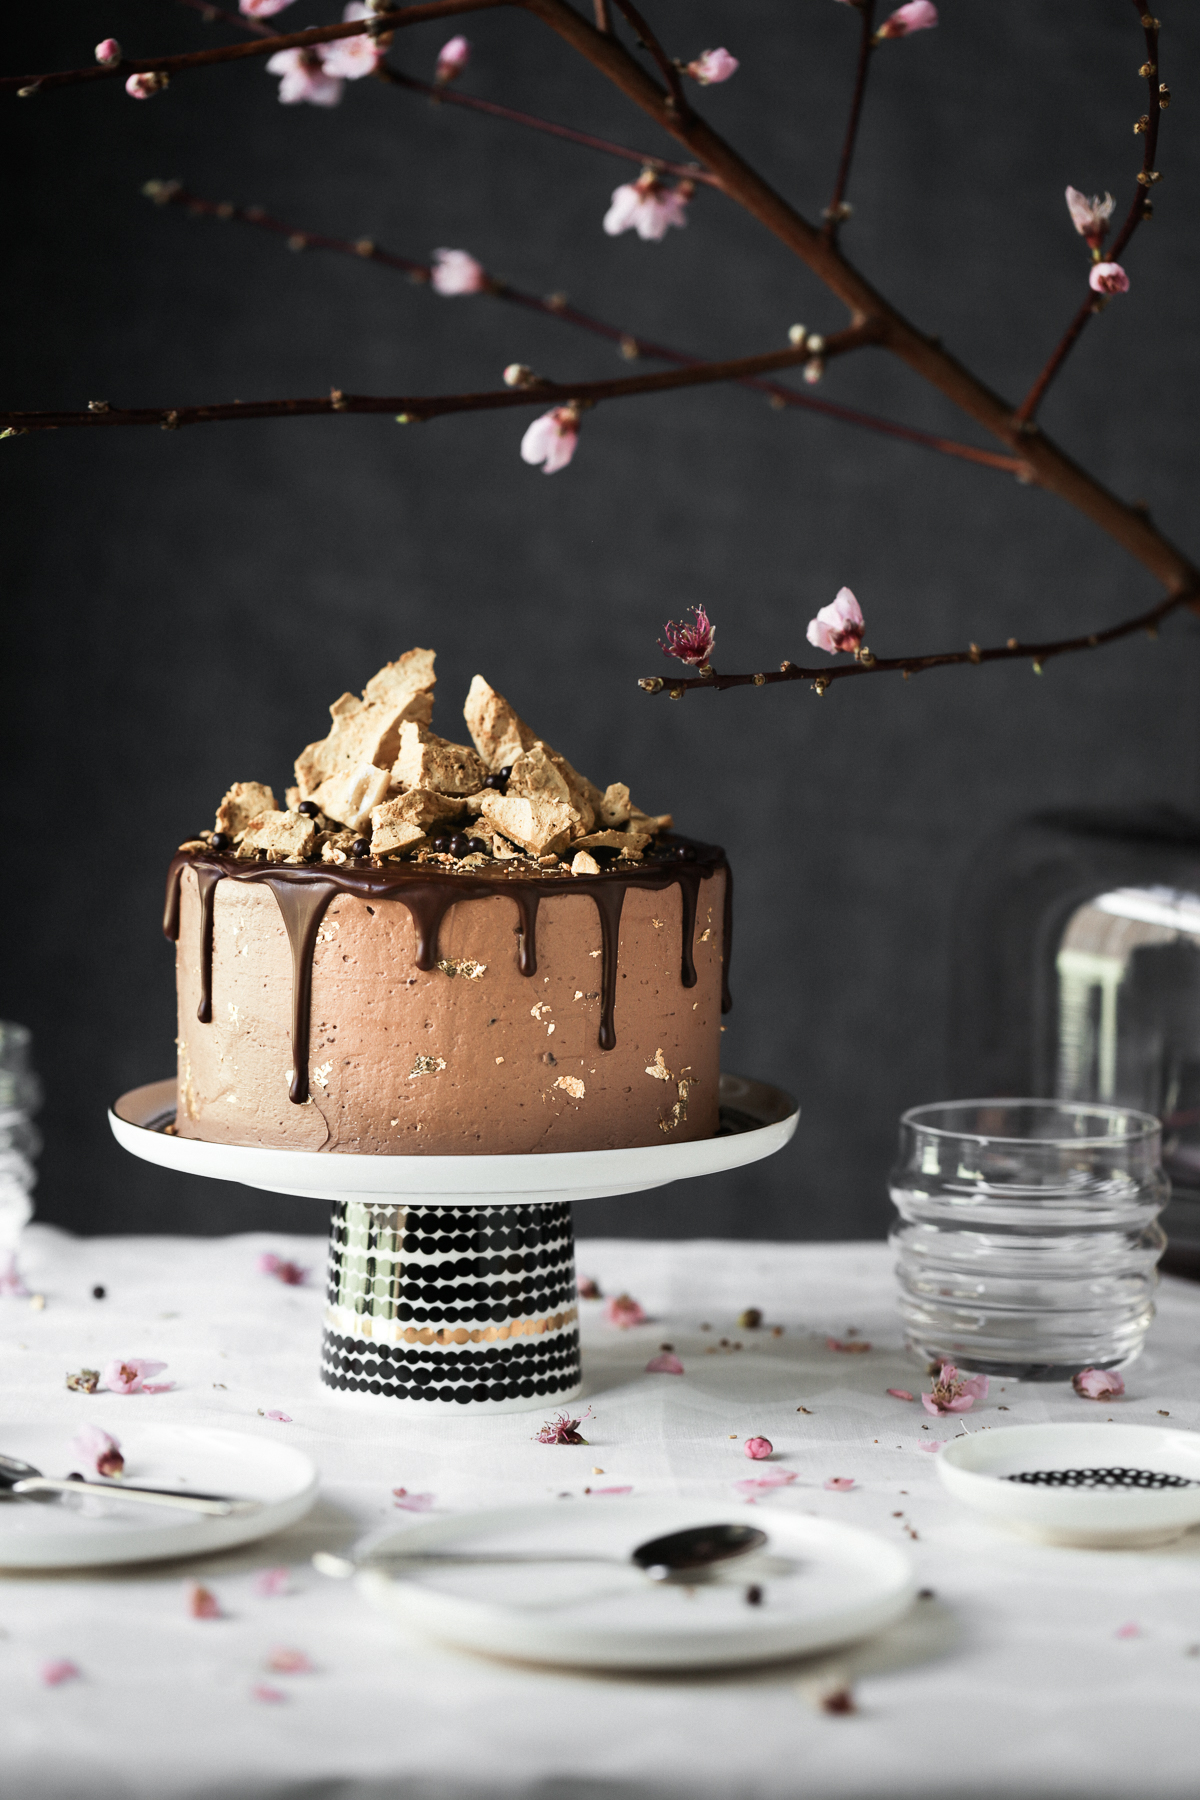
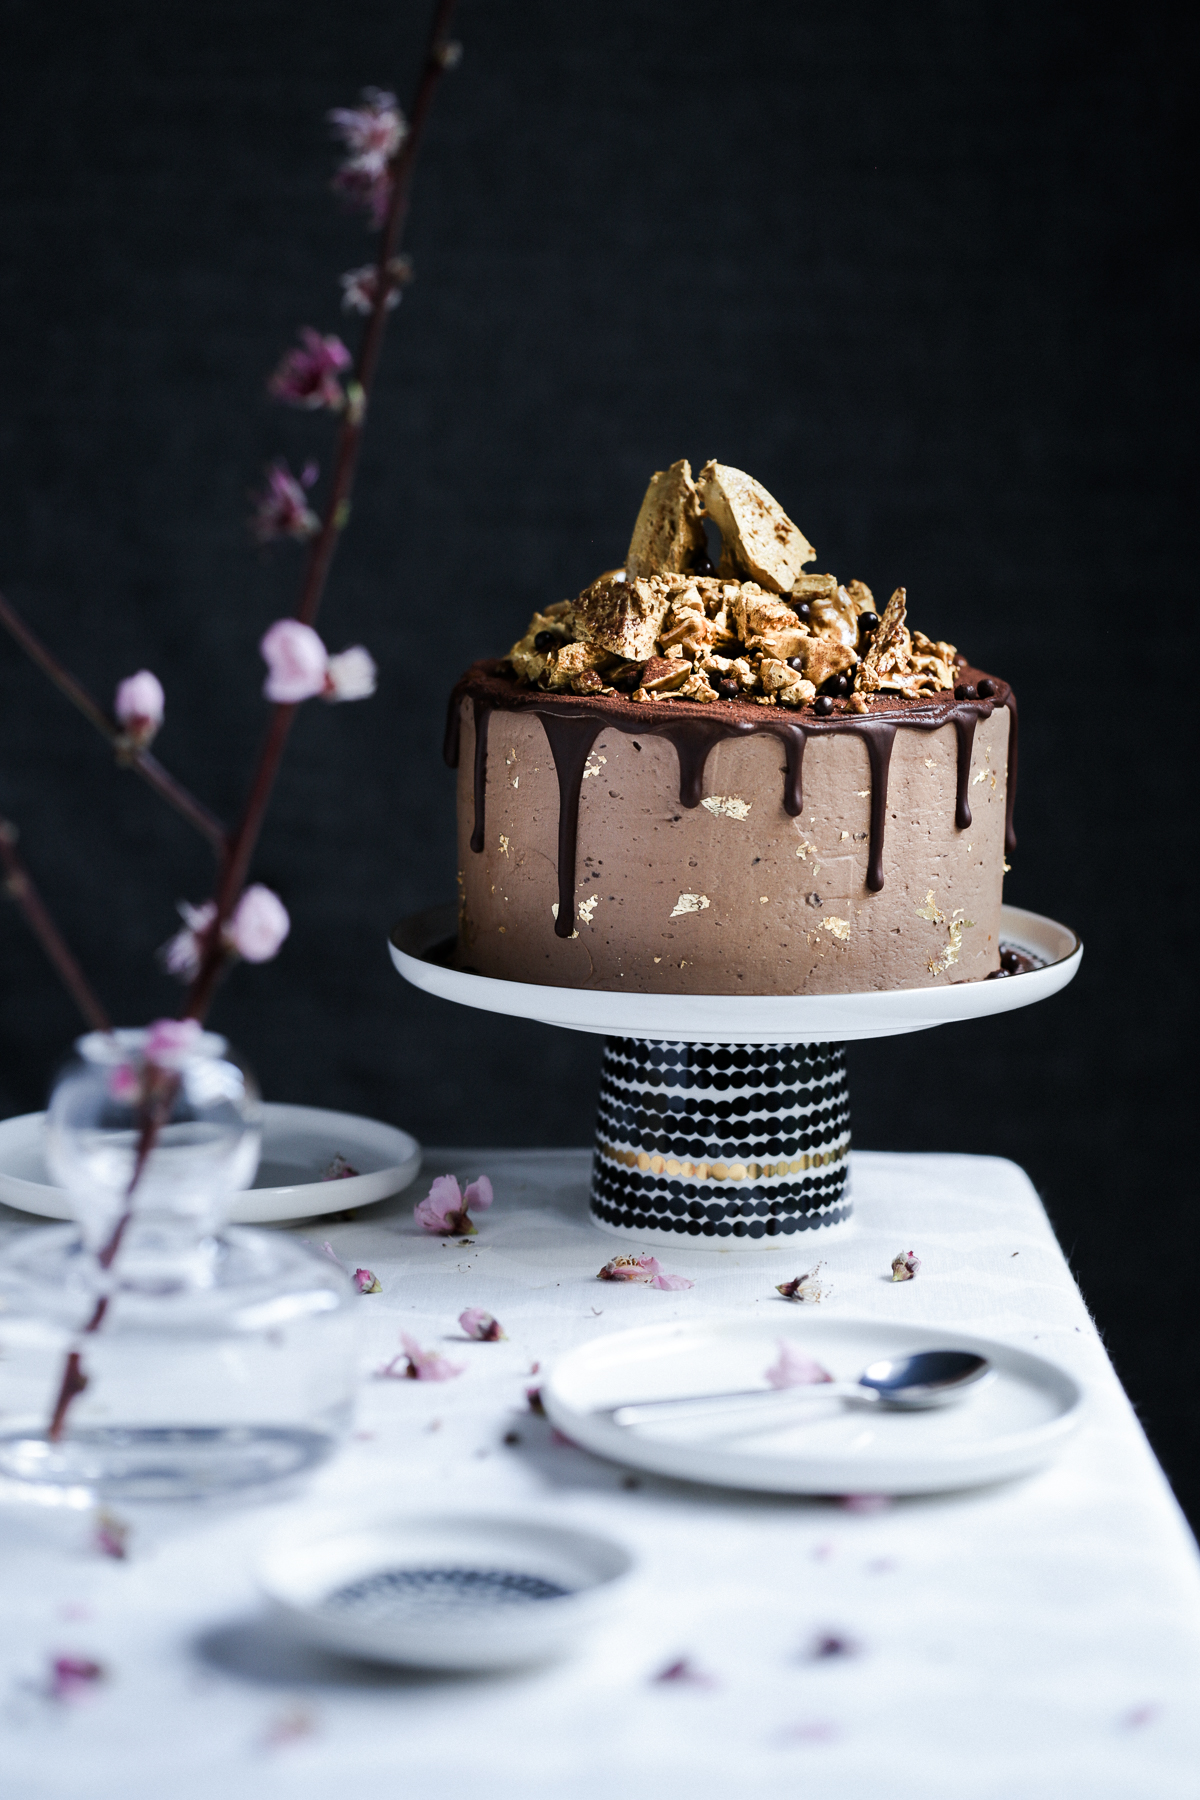
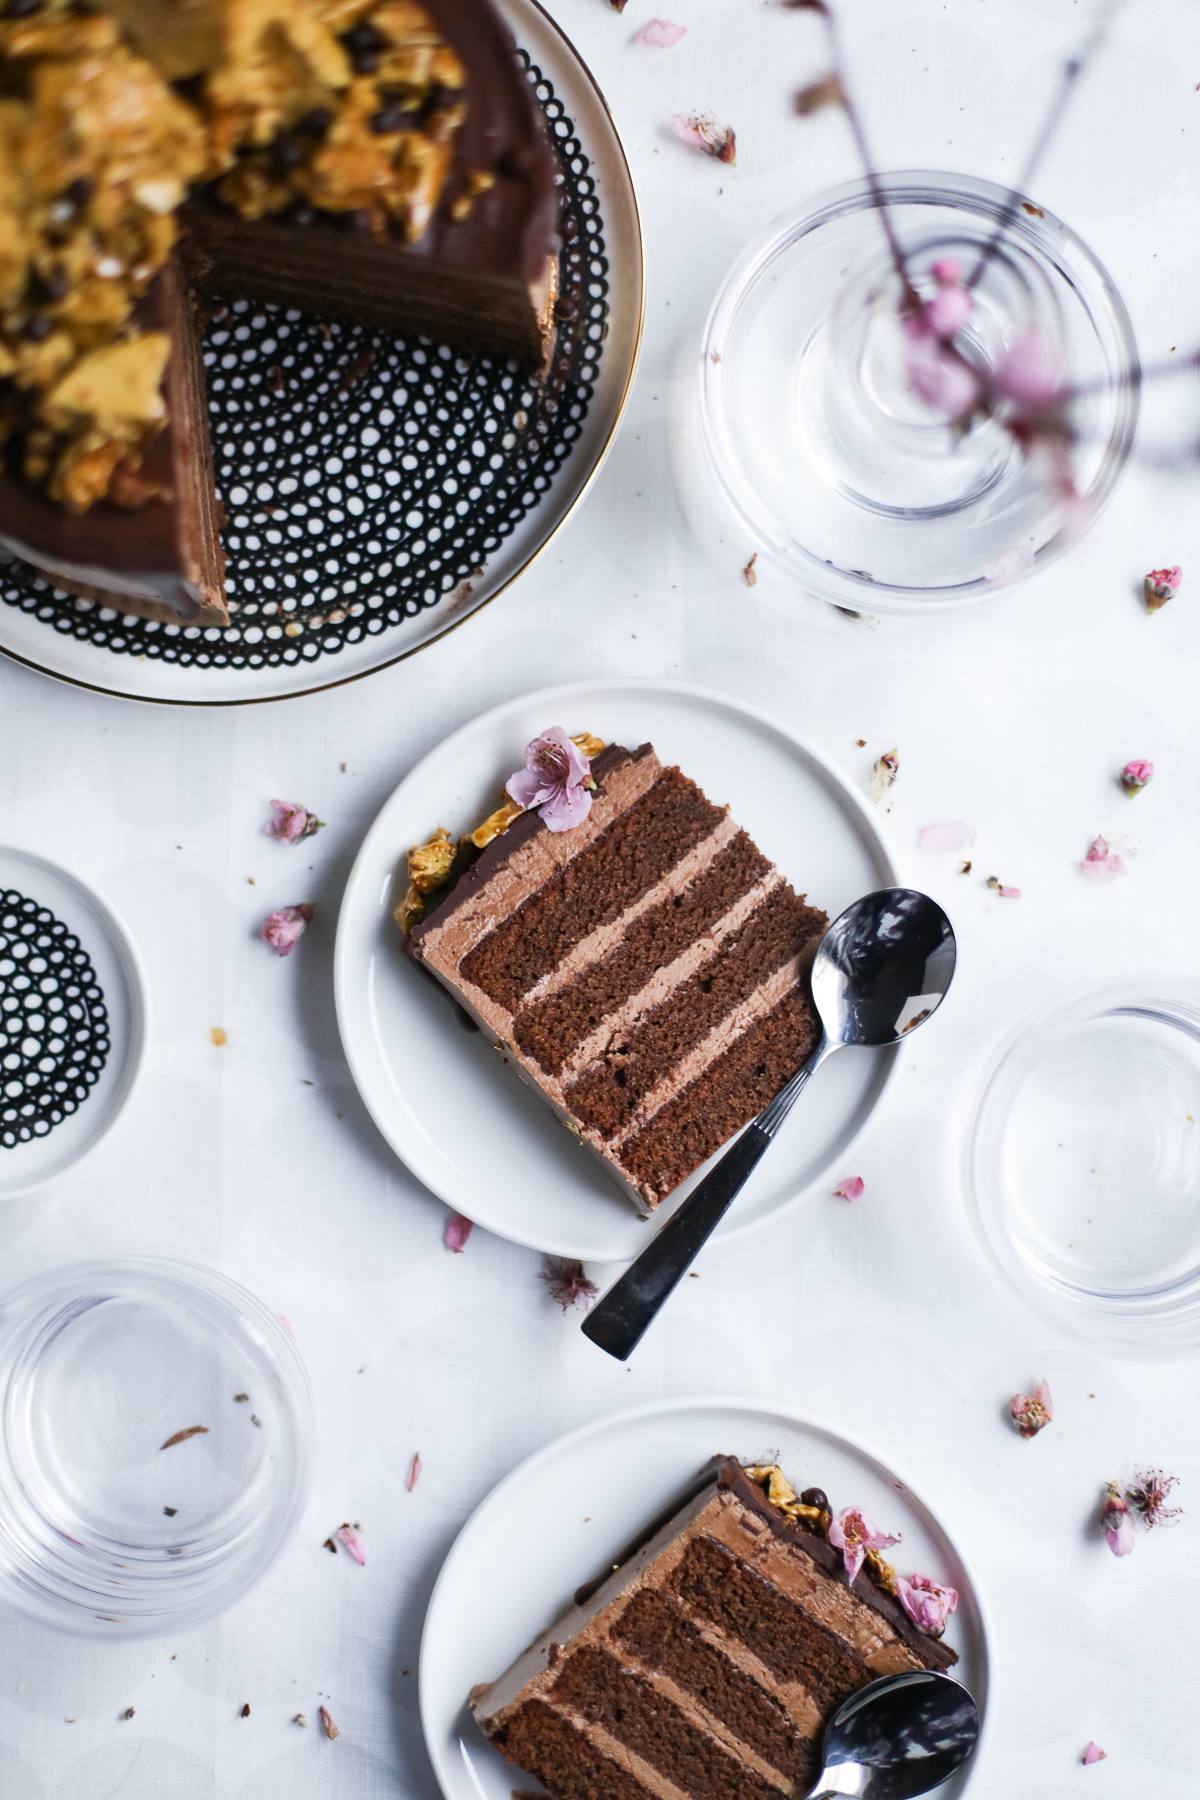
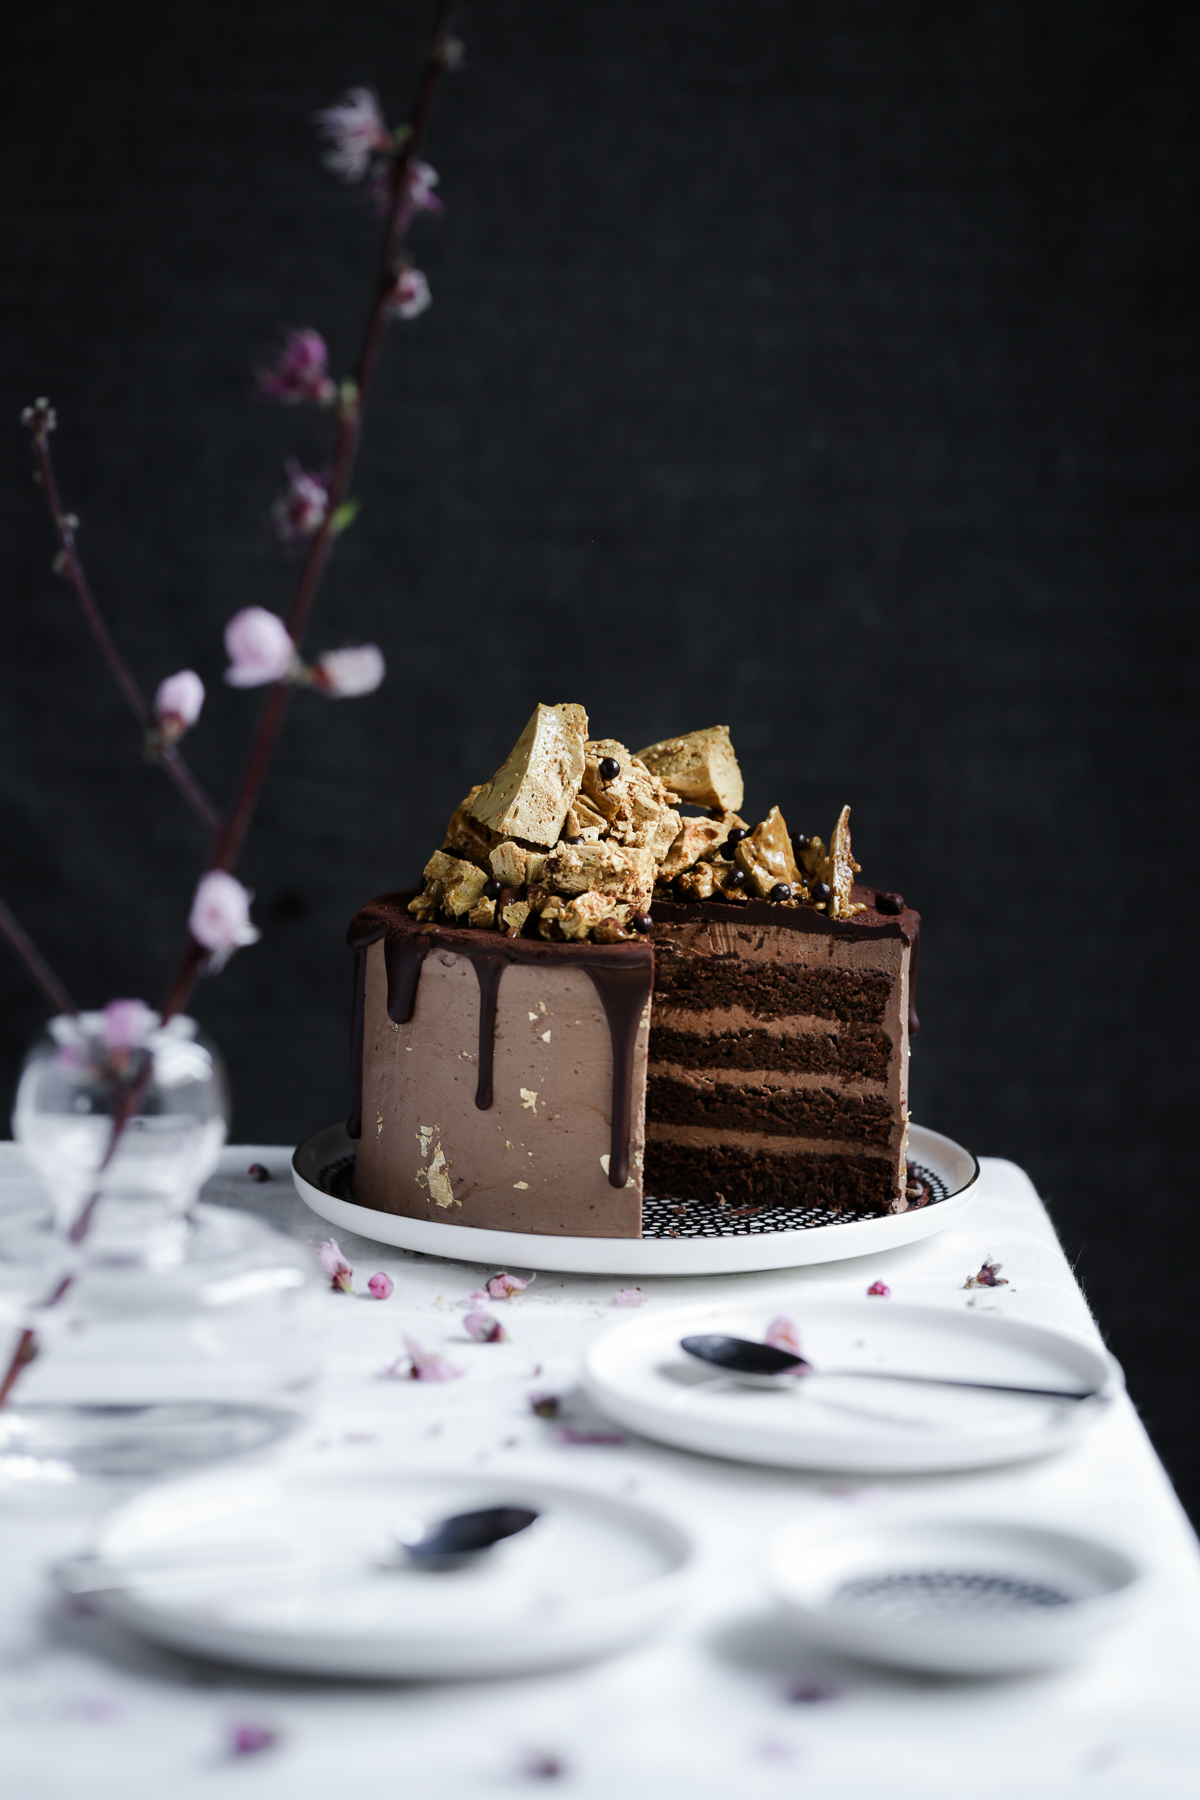
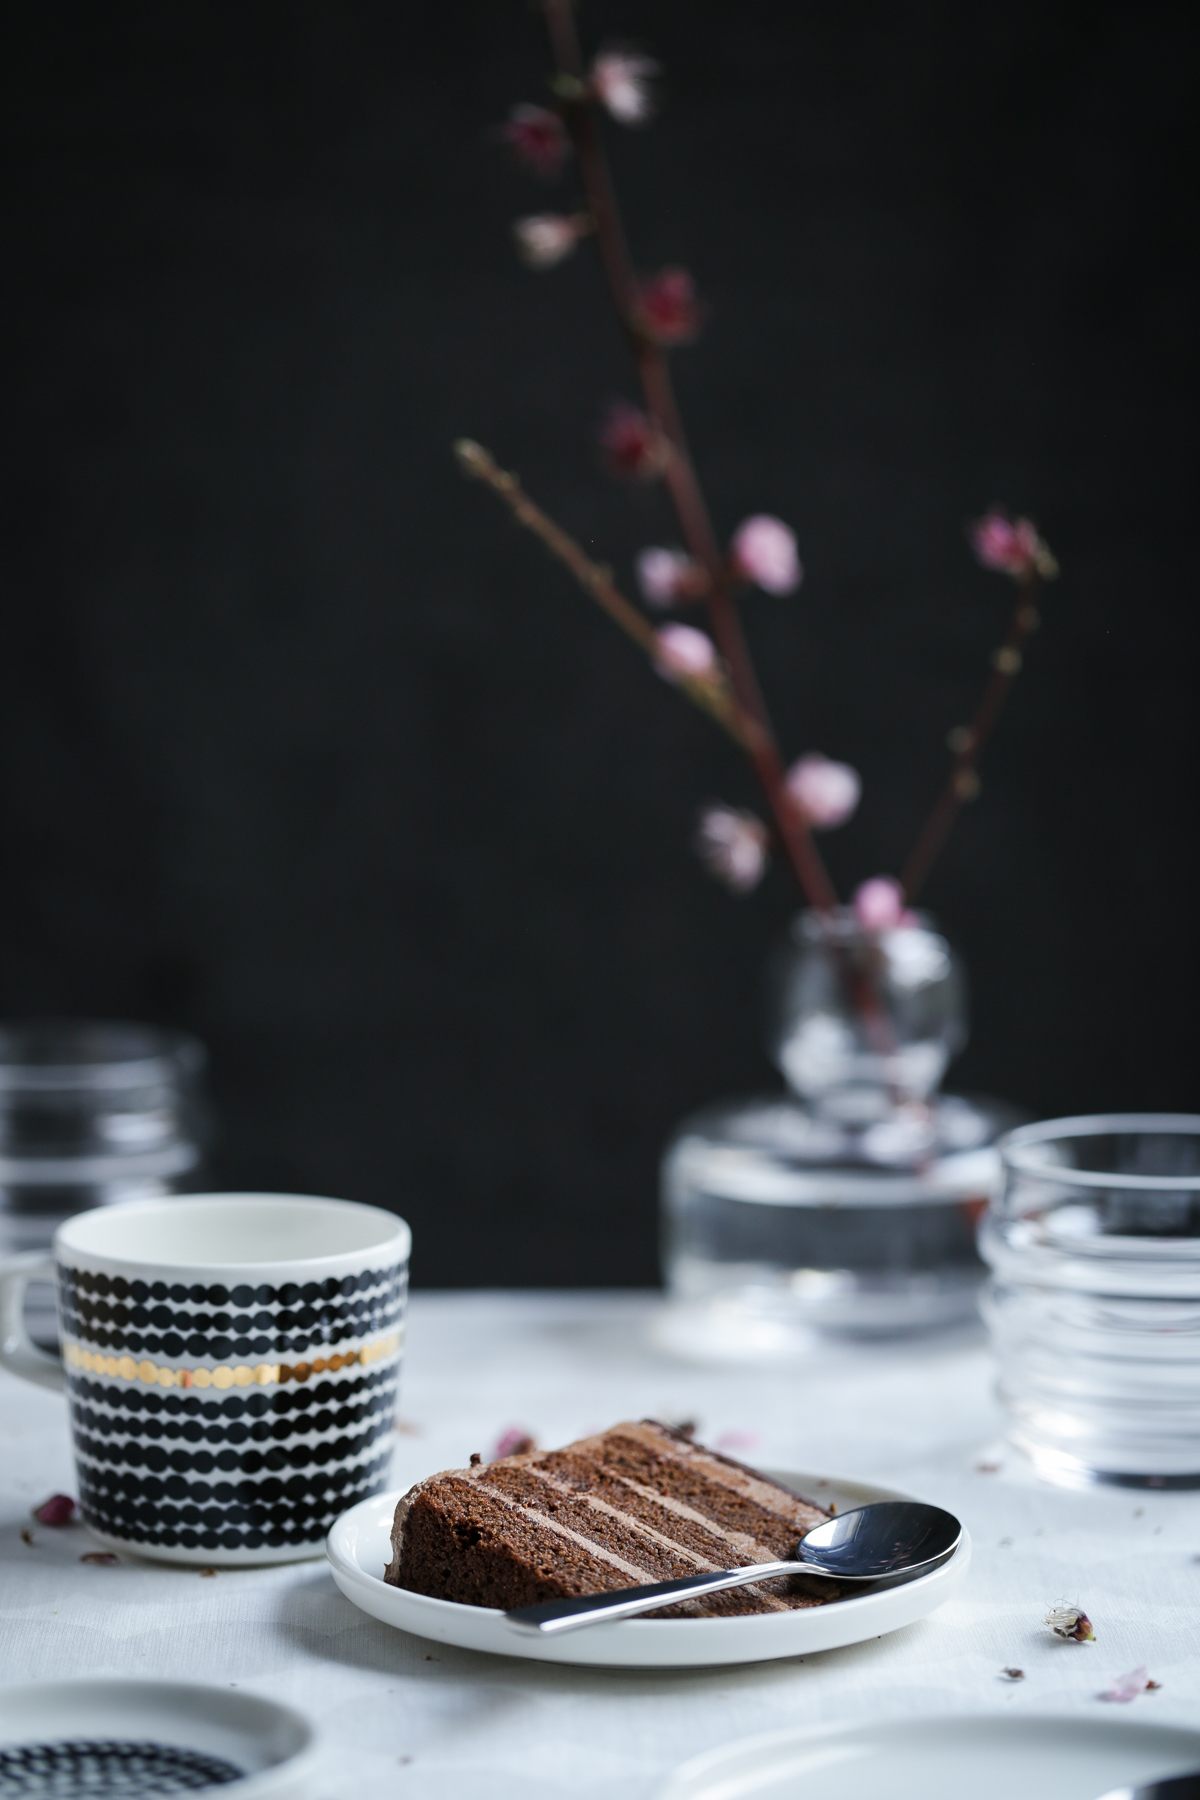
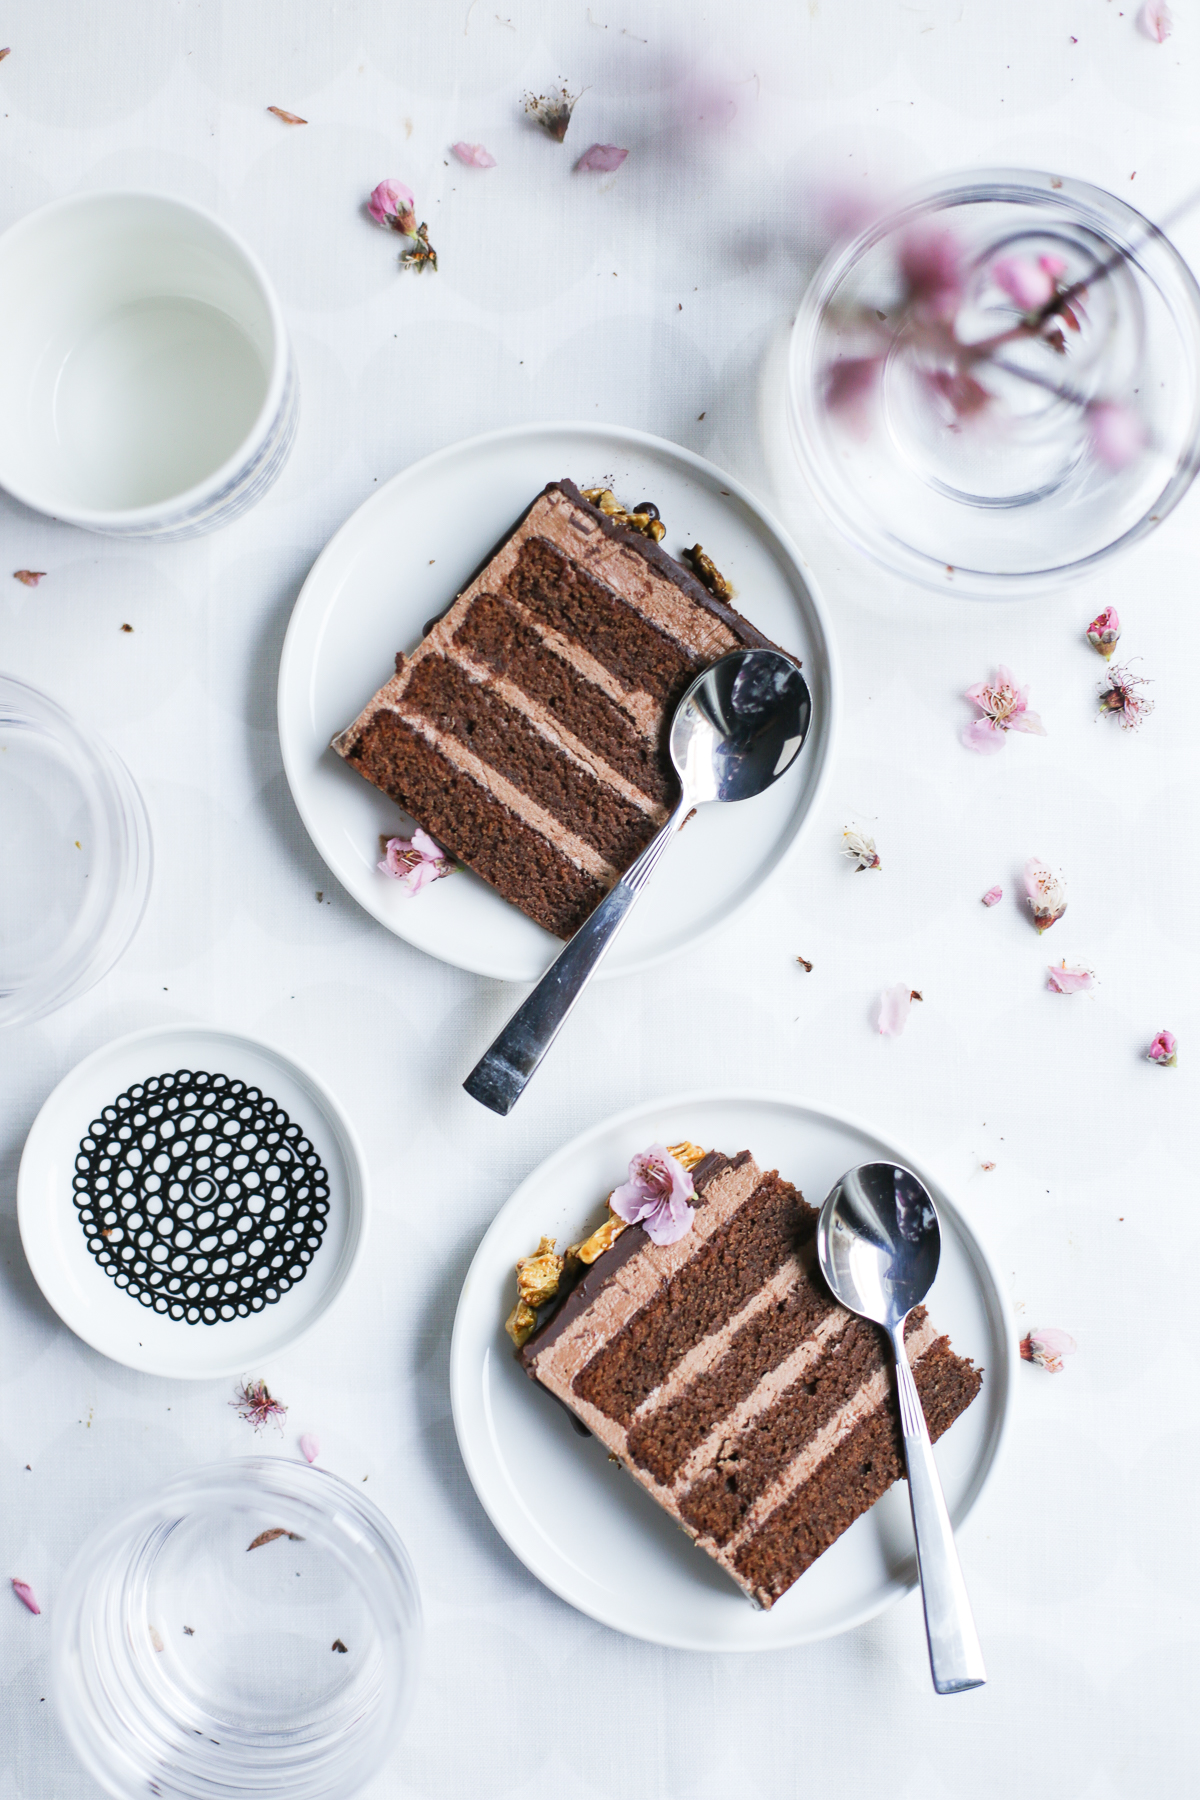
This layer cake is the ultimate chocolate indulgence, with rich dark chocolate layers, laced with velvety smooth chocolate swiss meringue buttercream and drizzled with a dark chocolate glaze. A delicious mound of crisp golden honeycomb sits proudly atop this luscious layer cake, providing a lovely textural crunch.

I had the pleasure of creating this recipe for one of my favourite lifestyle brands, Marimekko, to celebrate their tenth anniversary of their timeless Oiva ceramics. I’ve kept the flavour profile classic to complement their ceramic collection, while flecks of gold leaf are a nod to Marimekko‘s lustre tones to highlight the occasion.

This gorgeous layer cake would be perfect for any celebration, and I hope you enjoy baking and devouring it as much as I did creating it. This is a sponsored post, with all commentary being my own, and you can shop all the pieces in this stunning collection online and in store.

Chocolate Golden Honeycomb Cake | The Polka Dotter

Print

Chocolate Golden Honeycomb Cake

Chocolate Golden Honeycomb Cake | The Polka Dotter
Print Recipe

5 Stars 4 Stars 3 Stars 2 Stars 1 Star

5 from 2 reviews

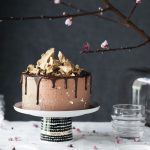
The ultimate layer cake indulgence – rich dark chocolate cake laced with chocolate buttercream, covered in crisp golden honeycomb and gold leaf flecks.

Ingredients

Scale

Dark Chocolate Layer Cake

  • 170g unsalted butter
  • 80g good quality dark chocolate
  • 170ml (2/3 cup) whole milk
  • 1 tsp vanilla paste
  • 1 tbsp coffee granules dissolved in 1-2 tbsp boiling water
  • 150g (1 cup) plain flour
  • 125g brown sugar
  • 125g caster sugar
  • 1 tsp baking powder
  • ¼ tsp fine sea salt
  • 2 tbsp dutch process cocoa powder
  • 80g almond meal
  • 2 large eggs, at room temperature
  • Gold leaf, to decorate

Chocolate Swiss Meringue Buttercream

  • 5 egg whites
  • 225g caster sugar
  • 250g unsalted butter, softened
  • ¼ tsp fine sea salt
  • 100g good quality dark chocolate, melted and cooled slightly
  • 2 tbsp dutch process cocoa powder, sifted

Chocolate Glaze

  • 100g good quality dark chocolate
  • 50g unsalted butter

Honeycomb

  • 200g caster sugar
  • ¼ cup honey
  • ¼ cup golden syrup
  • 2 tsp bicarbonate soda

Instructions

Dark Chocolate Layer Cake

  1. Preheat oven to 175°C (150°C fan-forced) and line two 15cm (6”) round baking pans with greaseproof paper.
  2. Melt butter and dark chocolate in medium saucepan, then add milk, vanilla and dissolved coffee and stir until smooth. Allow to cool 10 minutes.
  3. Sift together flour, sugar, baking powder, salt and cocoa, then mix with almond meal. Stir into dark chocolate mixture then gently whisk in eggs until smooth.
  4. Equally divide batter between pans, weighing pans to ensure equal weight. Bake in preheated oven for 45 minutes or until a skewer inserted comes out clean.
  5. Allow cakes to cool for 15 minutes in the pan, then turn out onto a wire rack and allow to cool completely.

Chocolate Swiss Meringue Buttercream

  1. Place egg whites and caster sugar in heatproof bowl over small saucepan of simmering water, ensuring the base of the bowl does not touch the water.
  2. Allow the sugar to dissolve, whisking intermittently, heating to 65°C to ensure egg whites are pasteurised.
  3. Allow mixture to cool to room temperature, then whisk in free-standing mixer until white, glossy, soft meringue peaks form.
  4. Very slowly add small 1cm cubes of softened butter, then melted dark chocolate, then sifted cocoa, and continue whisking until buttercream is light and fluffy.

Chocolate Glaze

  1. Melt chocolate and butter together in a saucepan then allow to cool slightly before use.

Honeycomb

  1. Place sugar, honey and golden syrup in a deep saucepan. The pan should be large enough to accommodate the hot bubbling honeycomb which will foam and rise significantly when bicarbonate added.
  2. Allow sugar to dissolve completely on low heat, then increase the heat until mixture reaches hard crack stage (150°C using a candy thermometer).
  3. Add the bicarb soda and stir vigorously to ensure evenly mixed. Honeycomb will foam and bubble, then transfer to a large lined baking tray and allow to cool completely.
  4. Store in an airtight container to maintain crispness until ready to use. To use, smash the honeycomb into shards using your hands, or a mallet if it’s very hard.
  5. Only 1/3-1/2 quantity of the honeycomb is required to decorate the cake, but it’s difficult to make a small batch. The excess can either be served with the cake slices, or enjoyed on a separate occasion by itself or to decorate another sweet treat. 

Assembly

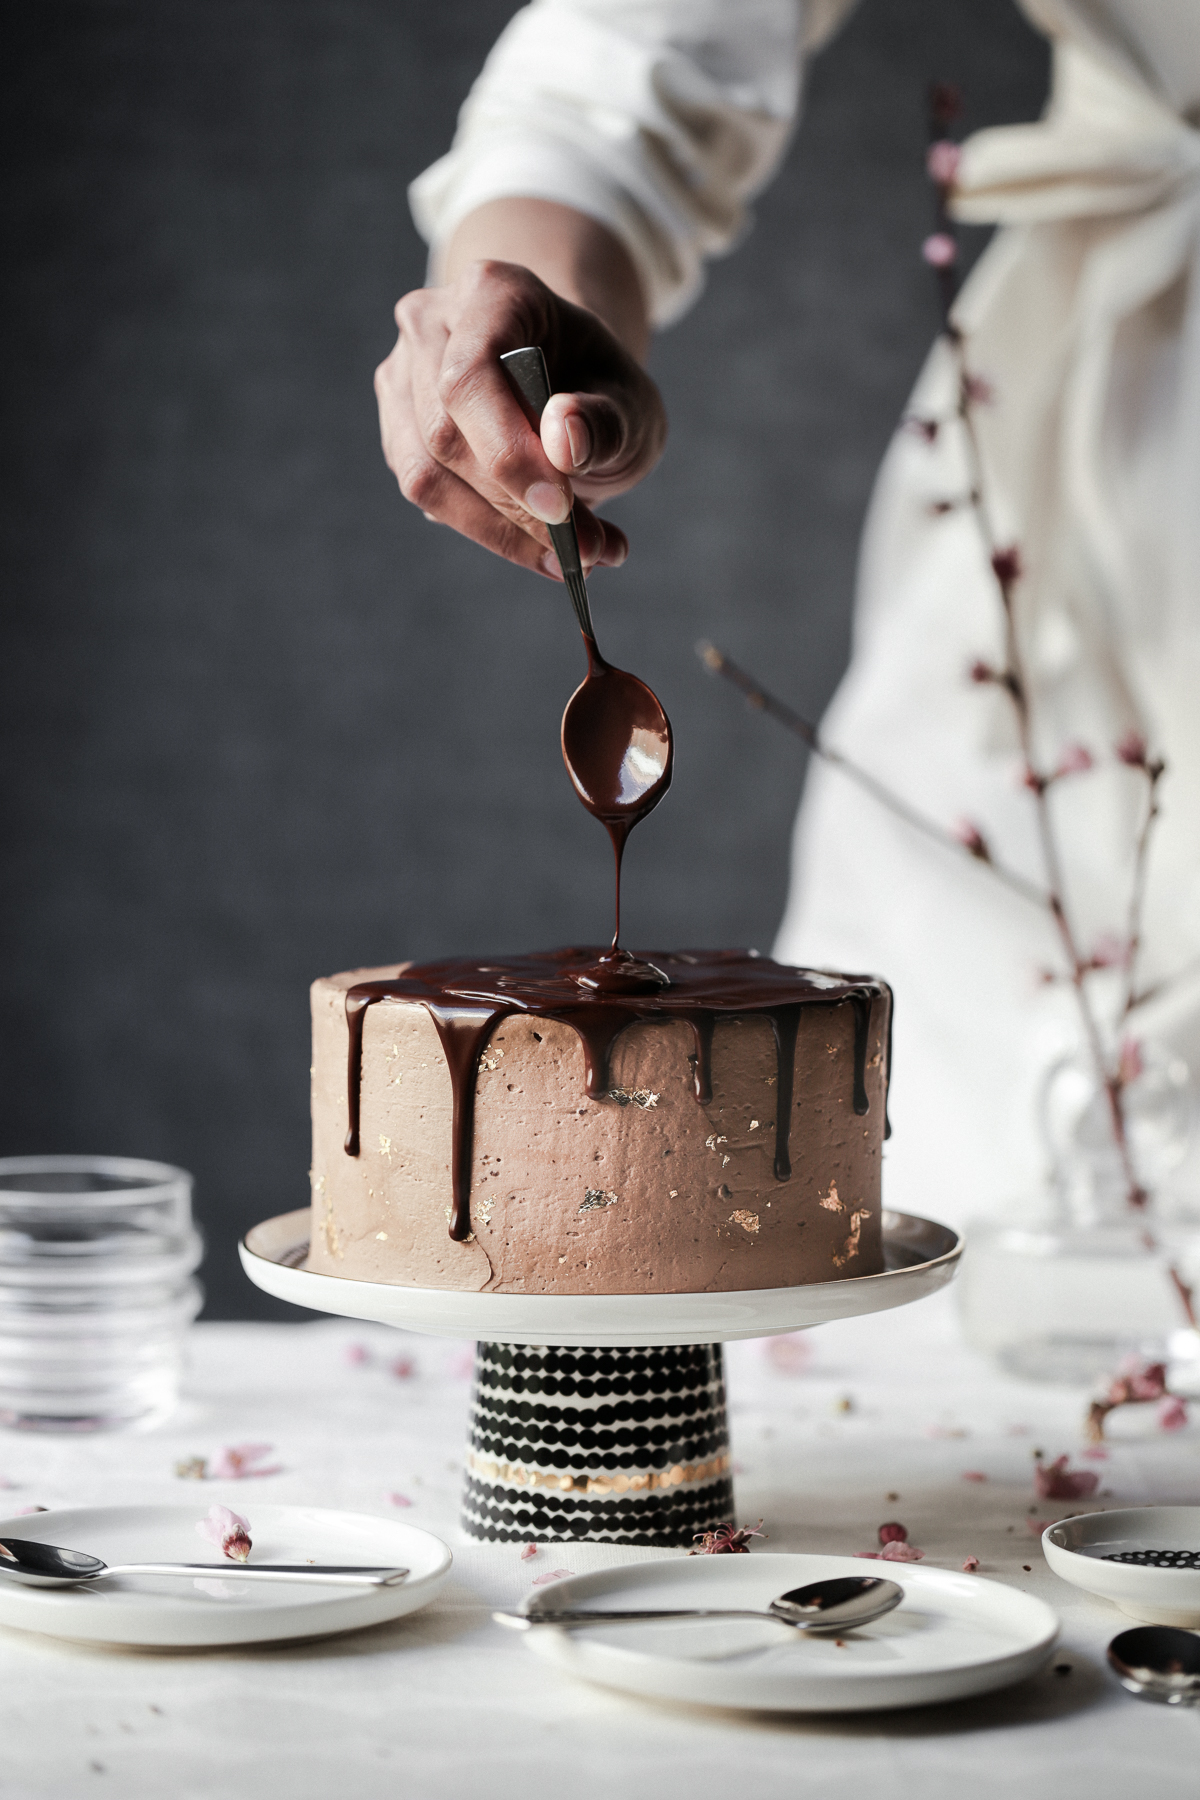
  1. Assembling this cake is easiest when the cake is slightly chilled, the buttercream is at room temperature and the chocolate glaze is slightly warm and fluid.
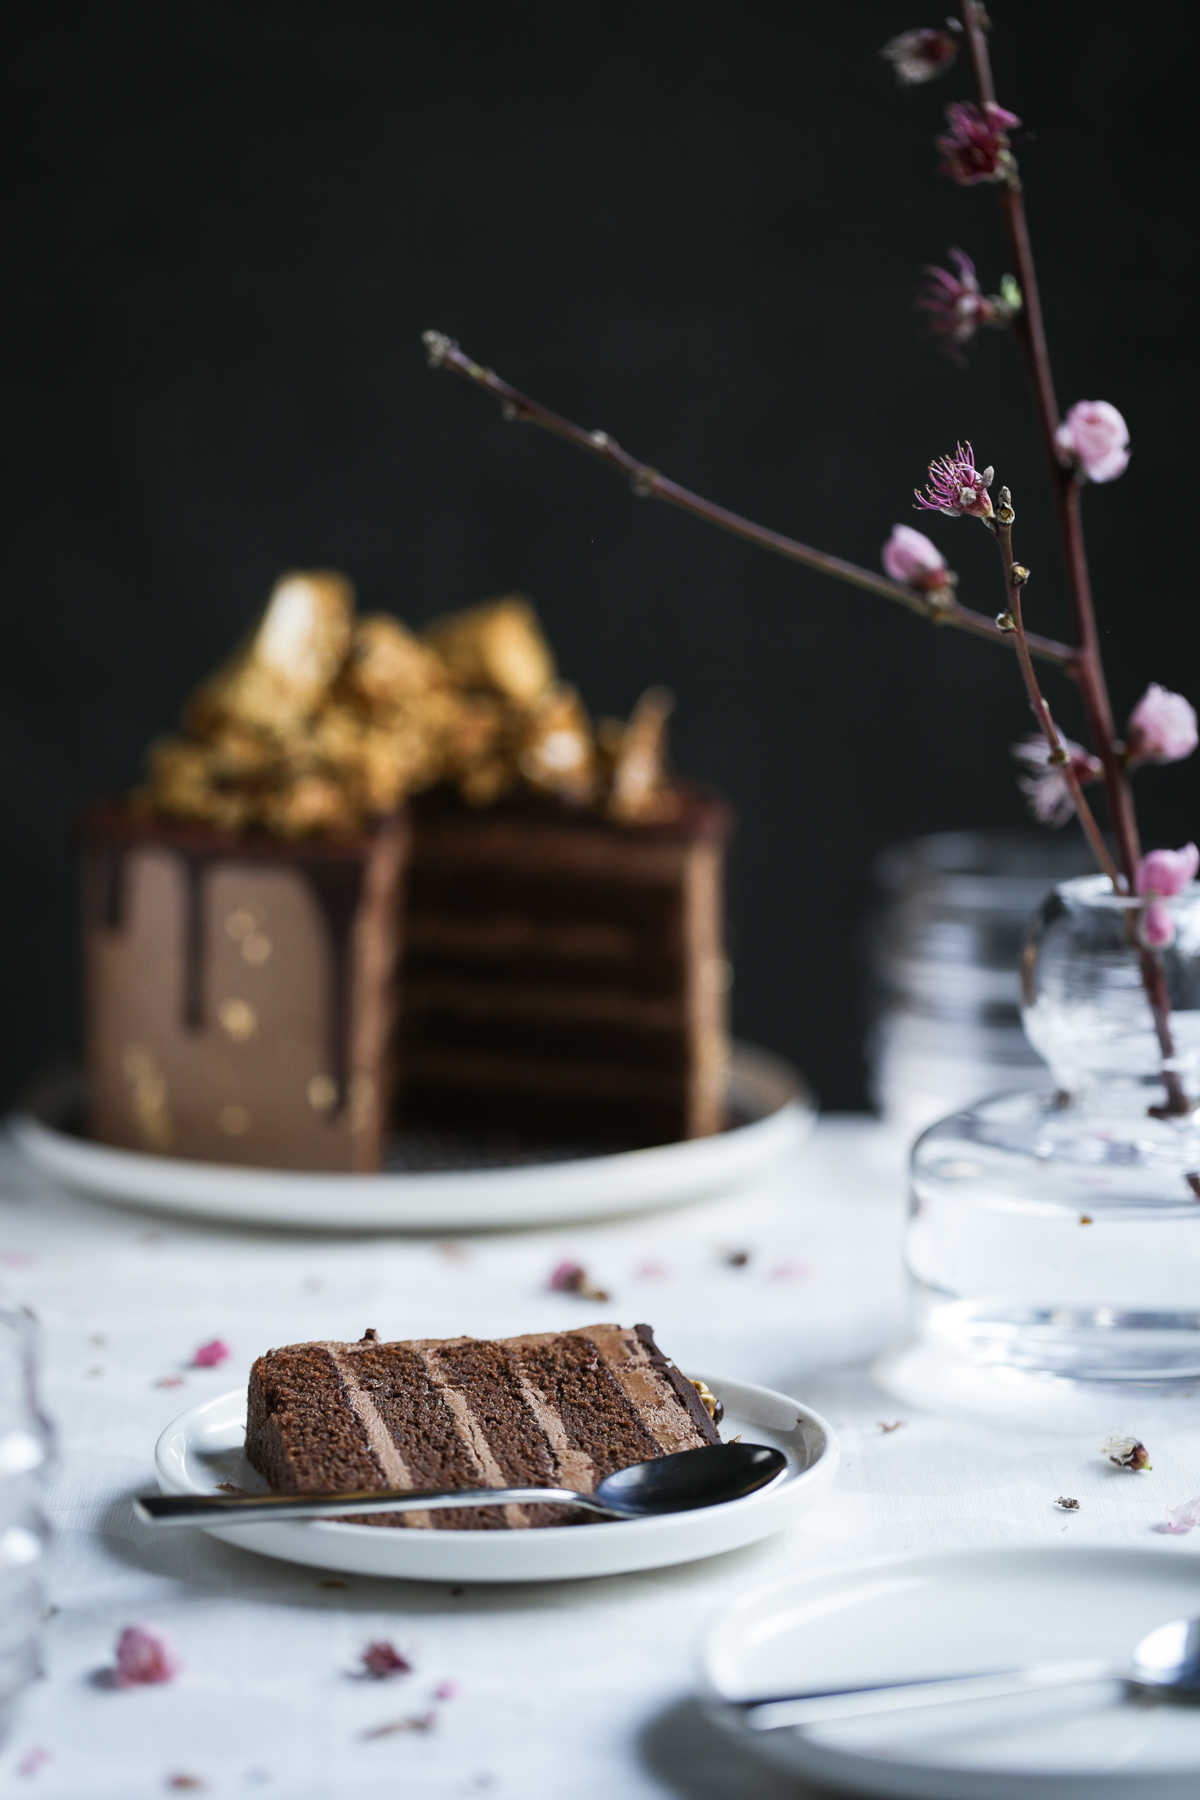
  2. Level each cake by slicing off the cake domes, then cut them in half lengthways to yield four cake layers in total. Use the base of one layer for the base of the cake, and the base of the other layer (turned upside down) for the top of the cake to avoid crumbs in the buttercream.
  3. Place the first layer on a round cake plate or turn-table and spread a thin layer of buttercream on the top, smoothing with a palate knife. Repeat frosting with each layer, then cover the sides and top of the cake with buttercream, smoothing with a palette knife.
  4. Place the cake in the fridge for about 15-20 mins at this stage to chill slightly, allowing this first thin layer of buttercream to form your ‘crumb coat’, locking in crumbs and preventing them from entering your final coat.
  5. Remove the cake from the fridge and using a palate knife, spread another layer of buttercream over the whole cake. Repeat this process of chilling and frosting if required to create a smooth crumb-free finish.
  6. Gently place pieces of gold leaf on the cake, then drizzle the chocolate glaze slowly over the top of the cake, allowing a little to drip down over the sides.
  7. Top with honeycomb pieces and serve at room temperature with a clean sharp hot knife.

Enjoy!

Notes

Makes one four-layer 15cm (6”) cake and serves 10-12 people

Did you make this recipe?

Tag @thepolkadotter on Instagram and hashtag it #polkadotbakes

Chocolate Golden Honeycomb Cake | The Polka Dotter
You may also like:
Peanut Butter Brownie Salted Caramel Crunch Cake
Chocolate Salted Caramel Brownie Cake + Fresh Figs
Gingerbread Cake + Salted Caramel

Filed Under: Cakes Tagged With: Chocolate, Honeycomb

Previous Post: « Fig & Blackberry Mini Pavlovas + Pomegranate Spiced Syrup
Next Post: Meringue Kissed Blackberry Brownies »

Reader Interactions

Comments

  1. Marsha

    January 29, 2019 at 11:01 pm

    What a gorgeous cake!!


    Reply
    • Salma

      February 4, 2019 at 7:20 pm

      Thanks so much Marsha!
      Kindest, Salma

      Reply
  2. Mandy

    February 7, 2019 at 11:49 am

    Do you think I could double this recipe? My cake tins are bigger unfortunately.

    Reply
    • Salma

      February 13, 2019 at 8:30 pm

      Hi Mandy,
      Thanks for your query. I’m not sure what size your cake tins are but as a rough guide, the recipes of most of my 6″ size layer cakes can be doubled for 8″ pans. Bear in mind the wider the cake, the more different the aesthetic will be, as the smaller cakes do give the illusion of a taller cake (relative to their diameter). Also, take care when slicing the 2 cakes to create 4 layers, as larger cakes can be more challenging to keep in one piece while cutting. You may need to adjust the baking time as well, and I would generally add on 5-10 minutes baking time for a larger cake, and double the amounts of frosting and chocolate glaze as well. Hope this helps and happy baking!
      Kind regards,
      Salma

      Reply
  3. Jess

    August 22, 2020 at 9:40 am

    Hey there! I have 7″ round pans, what would you recommend in terms of increasing the recipe? I was thinking 1,5x?

    Reply
    • Salma

      August 24, 2020 at 3:50 pm

      Hi Jess,
      Thanks for your query and interest in this recipe. Yes, I agree, multiplying the recipe by 1.5x should work quite well to convert from 6″ to 7″ pans, and don’t forget to multiply the amount of frosting as well. The amount of honeycomb you will yield from the original recipe should certainly suffice, and I suspect you will still find yourself with extra to nibble on while you assemble the cake or to enjoy at a later stage. Happy baking!
      Kindest,
      Salma

      Reply
      • Jess

        August 29, 2020 at 7:21 am

        Hey Salma
        Just checking back in to tell you how absolutely amazingly successful this recipe was! This was the best chocolate cake I’ve ever made, in texture and taste as well as ease of following your recipe. I am now saving this as my go-to for any chocolate cake order! You are amazing. The balance of the regular flour and almond flour makes for my favourite kind of texture and flavour. I’m blown away.
        And as we discussed, 1.5x the recipe was perfect for a 7” size. Thank you SO much.


        Reply
        • Salma

          September 15, 2020 at 10:05 pm

          Hi Jess,
          Thanks so much for baking this recipe and for stopping back to leave such lovely comments. I love that you have saved this recipe as your go-to chocolate cake – that is a massive compliment! I’m so glad you liked the little touches like the combination of flours to give it that perfect texture, and also pleased that the conversion to the 7″ pans worked well for you. I’m sure with your feedback, other bakers using this recipe will also find that tip helpful if they need to convert the recipe to a different size. It’s an absolute pleasure to create recipes knowing they are bringing people like yourself so much joy, so my sincerest thanks once again.

          Kind regards,
          Salma

          Reply

Leave a Reply to Jess Cancel reply

Your email address will not be published. Required fields are marked *

Recipe rating 5 Stars 4 Stars 3 Stars 2 Stars 1 Star

This site uses Akismet to reduce spam. Learn how your comment data is processed.

Primary Sidebar

Welcome!

Salma Sabdia | Food Photography

Hi, I’m Salma, and I love creating beautiful images and sweet treats. If you’re looking for a little baking inspiration, you’ve come to the right place.

SaveSave

  • Bloglovin
  • Facebook
  • Instagram
  • Pinterest

Instagram

Chai poached pears - the easiest and most comforti Chai poached pears - the easiest and most comforting dessert you’ll make this autumn. Salted caramel optional, but totally worth it 🤎 

Recipe linked in profile
My fine art photography print series has arrived! My fine art photography print series has arrived!

The perfect gift for the baker in your life, or treat yourself with a stylish addition to your kitchen, bedroom or home office.

This limited edition debut collection symbolises the joy of human connection through food, honouring the notion of blending nature with cake in a vibrant harmony.

Only 25 prints available worldwide | Shop the link in my profile if you’d love to make one yours

#fineartphotographyprints #photographyprints #giftsforthehome #giftsforbakers
🌟 A LOVELY GIVEAWAY 🌟 I’m launching a co 🌟 A LOVELY GIVEAWAY 🌟 

I’m launching a collection of fine art photography prints next week. And to thank you for your support, I’d love to give one away.

These prints are an elegant celebration of the joy of human connection through food, honouring the beauty and stillness of blending nature with cake in a vibrant harmony.

To enter:
1. Like this post 💫
2. Comment below with your favourite image: 1, 2, or 3.
3. Sign up to my mailing list via the link in my profile.

Ensure you’ve completed all 3 steps for a valid entry.

The winner will receive one unframed A3 fine art print, professionally printed in Australia on luxurious gallery-quality paper using archival inks.

Entries close: 11:59pm AEST, April 15
Winner will be notified via email on April 16

Thank you for being part of this launch – I’m so thrilled to share this new creative chapter with you.

Find the full Terms & Conditions in the comments below.
First look at something special I’ve been workin First look at something special I’ve been working on.. a fine art photography print collection!

I know so many of you have loved baking my recipes over the years, and would love the opportunity to add a touch of cake sophistication to your kitchen or home.

So I’m excited to launch a series of art prints next week showcasing your favourite cake images.

Priority access will be given to mailing list subscribers, so if you would love to secure your print before they launch to the general public, please take a moment to join my mailing list.

Find the link in my profile 😊
Sharing one last fig recipe before this glorious s Sharing one last fig recipe before this glorious season comes to a close.

I originally created this recipe for my former baking blog six years ago, albeit in miniature form. This season I’ve reimagined it in a classic rectangular design, but rest assured, the same enticing spiced pomegranate syrup is still there in all its glory.

If you’ve been on the hunt for a celebratory dessert that heroes juicy fresh figs, I hope your search ends here!

Recipe linked in profile
A month of meringue kisses! 🤍 It would appear A month of meringue kisses! 🤍 

It would appear that cardamom + rosewater meringues were the theme of last month, culminating in one last round of this Elegant Mess to celebrate a joyful Eid. 

I would love to know your favourite 😊

1. Pink Passionfruit Curd Cake
2. Fig & Blackberry Pavlova
3. Elegant Mess

And find all the recipes linked in my profile 😊
Weekend Baking Inspiration There’s a batch of g Weekend Baking Inspiration

There’s a batch of gingerbread dough chilling in our fridge along with a selection of lovely ingredients ready to be transformed into another round of this Elegant Mess. 

Eid, our annual celebration to conclude a month of fasting for Ramadan, is just around the corner, which means a weekend of baking ahead. 

The kids have been dreaming up a few other sweet things that they would love to bake, but we will see what transpires!

#weekendbaking #bakinginspiration #ramadandesserts #eiddesserts
A desire for a layered dessert that seamlessly ble A desire for a layered dessert that seamlessly blended all my favourite flavours and textures into one elegant bowl culminated in the creation of this dessert. 

The dreamer in me believes there is still a place in the world for the invention and reinvention of desserts. And that is what this recipe exemplifies; a beautiful offering that blends the nostalgic flavours of my childhood rooted in the intersection between Indian heritage and Middle Eastern cuisine, inspired by the humble trifles and pavlovas that were equally memorable culinary features of my Australian upbringing.

I have warmly embraced the name suggested and endorsed here by my fellow dessert lovers, an Elegant Mess, and invite you to welcome this beautifully messy dessert into your homes and hearts.

A dessert that symbolises the beauty of infusing cultures in a way that feels unique yet curiously familiar. And one that shares with you her stories of celebration and love.

Recipe linked in profile

#elegantmess #rosewater #pannacottarecipe #pomegranatejelly #ramadandesserts #eiddesserts
It’s hard to find the right words to say to enca It’s hard to find the right words to say to encapsulate this week, as my soul feels like it has run the full gamut of emotions.

It’s been one of celebrating a birthday, while also caring for an unwell family member. One of intense spirituality and fasting that accompanies Ramadan while also nervously preparing for a ‘once in a lifetime cyclone’. One of feeling the power of inspirational women as we recognise International Women’s Day, but also feeling the uncertain reality of waking up each day to see what destruction the wild weather has caused.

So I’m rather lost for words. But what I do also feel is a deep sense of gratitude for the moments that have made this week beautiful, the people that I am lucky to call my friends and family, and the safety, shelter, health and food that we often so easily take for granted.

And thanks to all of you who have reached out with kindness and support 🩷

And here’s that lovely little cake I promised you. The darling Earl Grey Lavender Cake + Honey Salted Caramel. Garnished with fresh figs of course, because I think you all know how much I adore them. But a little sprinkle of pink sea salt flakes would also do just fine.

Recipe linked in profile 🩷

#earlgreycake #lavendercake #honeycake #saltedcaramelcake #teacake #layercake #cakerecipe #autumnbaking #foodstylingandphotography
Follow @thepolkadotter on Instagram

Latest Blog Posts

Blood Orange + Earl Grey Bundt Cake | The Polka Dotter
Sour Cherry & Chocolate Heart Crust Buns
Roasted Plum Swirl Ice Cream | The Polka Dotter
Blackberry & Chocolate Cupcakes | The Polka Dotter
Honey Lavender Ice Cream | The Polka Dotter
Rosewater Panna Cotta + Fresh Figs | The Polka Dotter
Chocolate Macadamia Black Sesame Cake | The Polka Dotter
strawberry-macadamia-mango-ice-cream-terrine
gingerbread-cookies-with-lemon-icing

Copyright © 2025 · Foodie Pro & The Genesis Framework