Chocolate Golden Honeycomb Cake
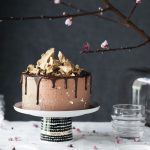
The ultimate layer cake indulgence – rich dark chocolate cake laced with chocolate buttercream, covered in crisp golden honeycomb and gold leaf flecks.
Ingredients
Scale
Dark Chocolate Layer Cake
- 170g unsalted butter
- 80g good quality dark chocolate
- 170ml (2/3 cup) whole milk
- 1 tsp vanilla paste
- 1 tbsp coffee granules dissolved in 1-2 tbsp boiling water
- 150g (1 cup) plain flour
- 125g brown sugar
- 125g caster sugar
- 1 tsp baking powder
- ¼ tsp fine sea salt
- 2 tbsp dutch process cocoa powder
- 80g almond meal
- 2 large eggs, at room temperature
- Gold leaf, to decorate
Chocolate Swiss Meringue Buttercream
- 5 egg whites
- 225g caster sugar
- 250g unsalted butter, softened
- ¼ tsp fine sea salt
- 100g good quality dark chocolate, melted and cooled slightly
- 2 tbsp dutch process cocoa powder, sifted
Chocolate Glaze
- 100g good quality dark chocolate
- 50g unsalted butter
Honeycomb
- 200g caster sugar
- ¼ cup honey
- ¼ cup golden syrup
- 2 tsp bicarbonate soda
Instructions
Dark Chocolate Layer Cake
- Preheat oven to 175°C (150°C fan-forced) and line two 15cm (6”) round baking pans with greaseproof paper.
- Melt butter and dark chocolate in medium saucepan, then add milk, vanilla and dissolved coffee and stir until smooth. Allow to cool 10 minutes.
- Sift together flour, sugar, baking powder, salt and cocoa, then mix with almond meal. Stir into dark chocolate mixture then gently whisk in eggs until smooth.
- Equally divide batter between pans, weighing pans to ensure equal weight. Bake in preheated oven for 45 minutes or until a skewer inserted comes out clean.
- Allow cakes to cool for 15 minutes in the pan, then turn out onto a wire rack and allow to cool completely.
Chocolate Swiss Meringue Buttercream
- Place egg whites and caster sugar in heatproof bowl over small saucepan of simmering water, ensuring the base of the bowl does not touch the water.
- Allow the sugar to dissolve, whisking intermittently, heating to 65°C to ensure egg whites are pasteurised.
- Allow mixture to cool to room temperature, then whisk in free-standing mixer until white, glossy, soft meringue peaks form.
- Very slowly add small 1cm cubes of softened butter, then melted dark chocolate, then sifted cocoa, and continue whisking until buttercream is light and fluffy.
Chocolate Glaze
- Melt chocolate and butter together in a saucepan then allow to cool slightly before use.
Honeycomb
- Place sugar, honey and golden syrup in a deep saucepan. The pan should be large enough to accommodate the hot bubbling honeycomb which will foam and rise significantly when bicarbonate added.
- Allow sugar to dissolve completely on low heat, then increase the heat until mixture reaches hard crack stage (150°C using a candy thermometer).
- Add the bicarb soda and stir vigorously to ensure evenly mixed. Honeycomb will foam and bubble, then transfer to a large lined baking tray and allow to cool completely.
- Store in an airtight container to maintain crispness until ready to use. To use, smash the honeycomb into shards using your hands, or a mallet if it’s very hard.
- Only 1/3-1/2 quantity of the honeycomb is required to decorate the cake, but it’s difficult to make a small batch. The excess can either be served with the cake slices, or enjoyed on a separate occasion by itself or to decorate another sweet treat.
Assembly
- Assembling this cake is easiest when the cake is slightly chilled, the buttercream is at room temperature and the chocolate glaze is slightly warm and fluid.
- Level each cake by slicing off the cake domes, then cut them in half lengthways to yield four cake layers in total. Use the base of one layer for the base of the cake, and the base of the other layer (turned upside down) for the top of the cake to avoid crumbs in the buttercream.
- Place the first layer on a round cake plate or turn-table and spread a thin layer of buttercream on the top, smoothing with a palate knife. Repeat frosting with each layer, then cover the sides and top of the cake with buttercream, smoothing with a palette knife.
- Place the cake in the fridge for about 15-20 mins at this stage to chill slightly, allowing this first thin layer of buttercream to form your ‘crumb coat’, locking in crumbs and preventing them from entering your final coat.
- Remove the cake from the fridge and using a palate knife, spread another layer of buttercream over the whole cake. Repeat this process of chilling and frosting if required to create a smooth crumb-free finish.
- Gently place pieces of gold leaf on the cake, then drizzle the chocolate glaze slowly over the top of the cake, allowing a little to drip down over the sides.
- Top with honeycomb pieces and serve at room temperature with a clean sharp hot knife.
Enjoy!
Notes
Makes one four-layer 15cm (6”) cake and serves 10-12 people
Find it online: https://thepolkadotter.com/chocolate-golden-honeycomb-cake/