
There’s something incredibly alluring about a beautiful layer cake. The best ones have you torn between wanting to stop and admire their elegance, and the desire to devour the entire creation all at the same time.
Whether you like your layer cakes dressed or naked, dripping with chocolate ganache or salted caramel, filled with frosting or tangy curd, adorned with fresh flowers or fruit, or piled high with macarons or meringue kisses, there are some general layer cake tips that will make your layer cakes go from ho-hum to oh-wow.
I can’t emphasise enough how much each little step below makes a difference in achieving a beautiful cake with a professional finish and perfectly neat layers. The little details really do contribute to the perfect layer cake, so remember to allow yourself plenty of time, and by following each tip carefully you will be well on your way to creating a gorgeous delicious layer cake.
BAKING CAKE LAYERS
Creating the perfect layer cake starts with perfect cake layers, and that means neat, even, equal layers that taste amazing.
Greasing or lining your tin with greaseproof paper
Greasing the cake tin itself or lining the tin with greaseproof paper is essential to ensure your cakes are easily removed from their cake tins with smooth neat edges. Both methods work well if done correctly, so it’s up to you to use whichever you prefer.
If greasing the pans, first wipe oil or melted butter on the whole inner surface of your cake tin, then lightly sift flour on the entire inner surface. Turn the pan upside down over the sink and lightly tap it to remove excess flour, and your prep is complete.
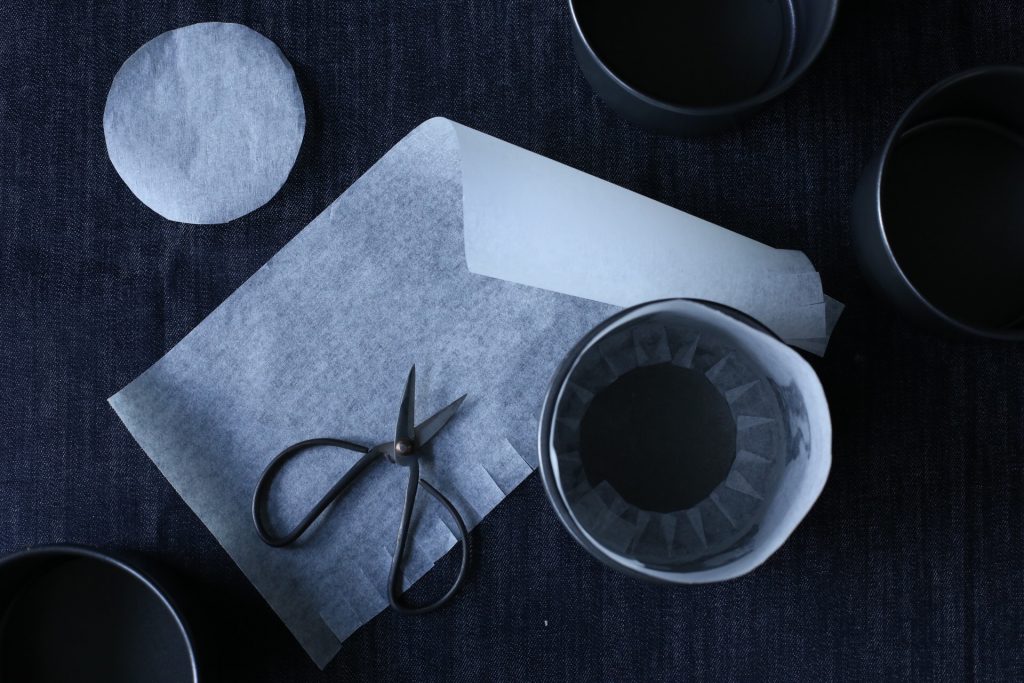
If using greaseproof paper, I still suggest using a little bit of oil on the whole inner surface of the tin, to allow the greaseproof paper to stick to it. Construct a handy paper collar (as shown in the image below) to line the sides of your cake tin. To cover the base, use the cake tin to trace and cut out a circle of greaseproof paper, then place it in the bottom of the tin.
 When the cakes are removed from the oven, allow them to cool slightly then turn them out onto a wire rack and if using greaseproof paper, remove it. I also often use a springform pan with a removable base to further facilitate easy cake removal.
Weighing the batter
This tip is important for any cake in which the cake layers are baked in more than one pan, to avoid having some really thick layers and others that are too thin. To weigh the batter, simply place your (identical) cake tins on the kitchen scale, already filled with batter, and ensure they have equal weight.
PREPARING TO ASSEMBLE YOUR LAYER CAKE
To allow your layer cake assembly to go smoothly, ensure you are fully prepared with the following tips.
Have all the right tools at hand
The following items will make assembling your layer cake much easier and give you a more professional finish: large serrated knife or cake leveller, cake stand or turntable, cake board, offset palette knife, piping bag with round nozzle.
Levelling and slicing the cake into layers
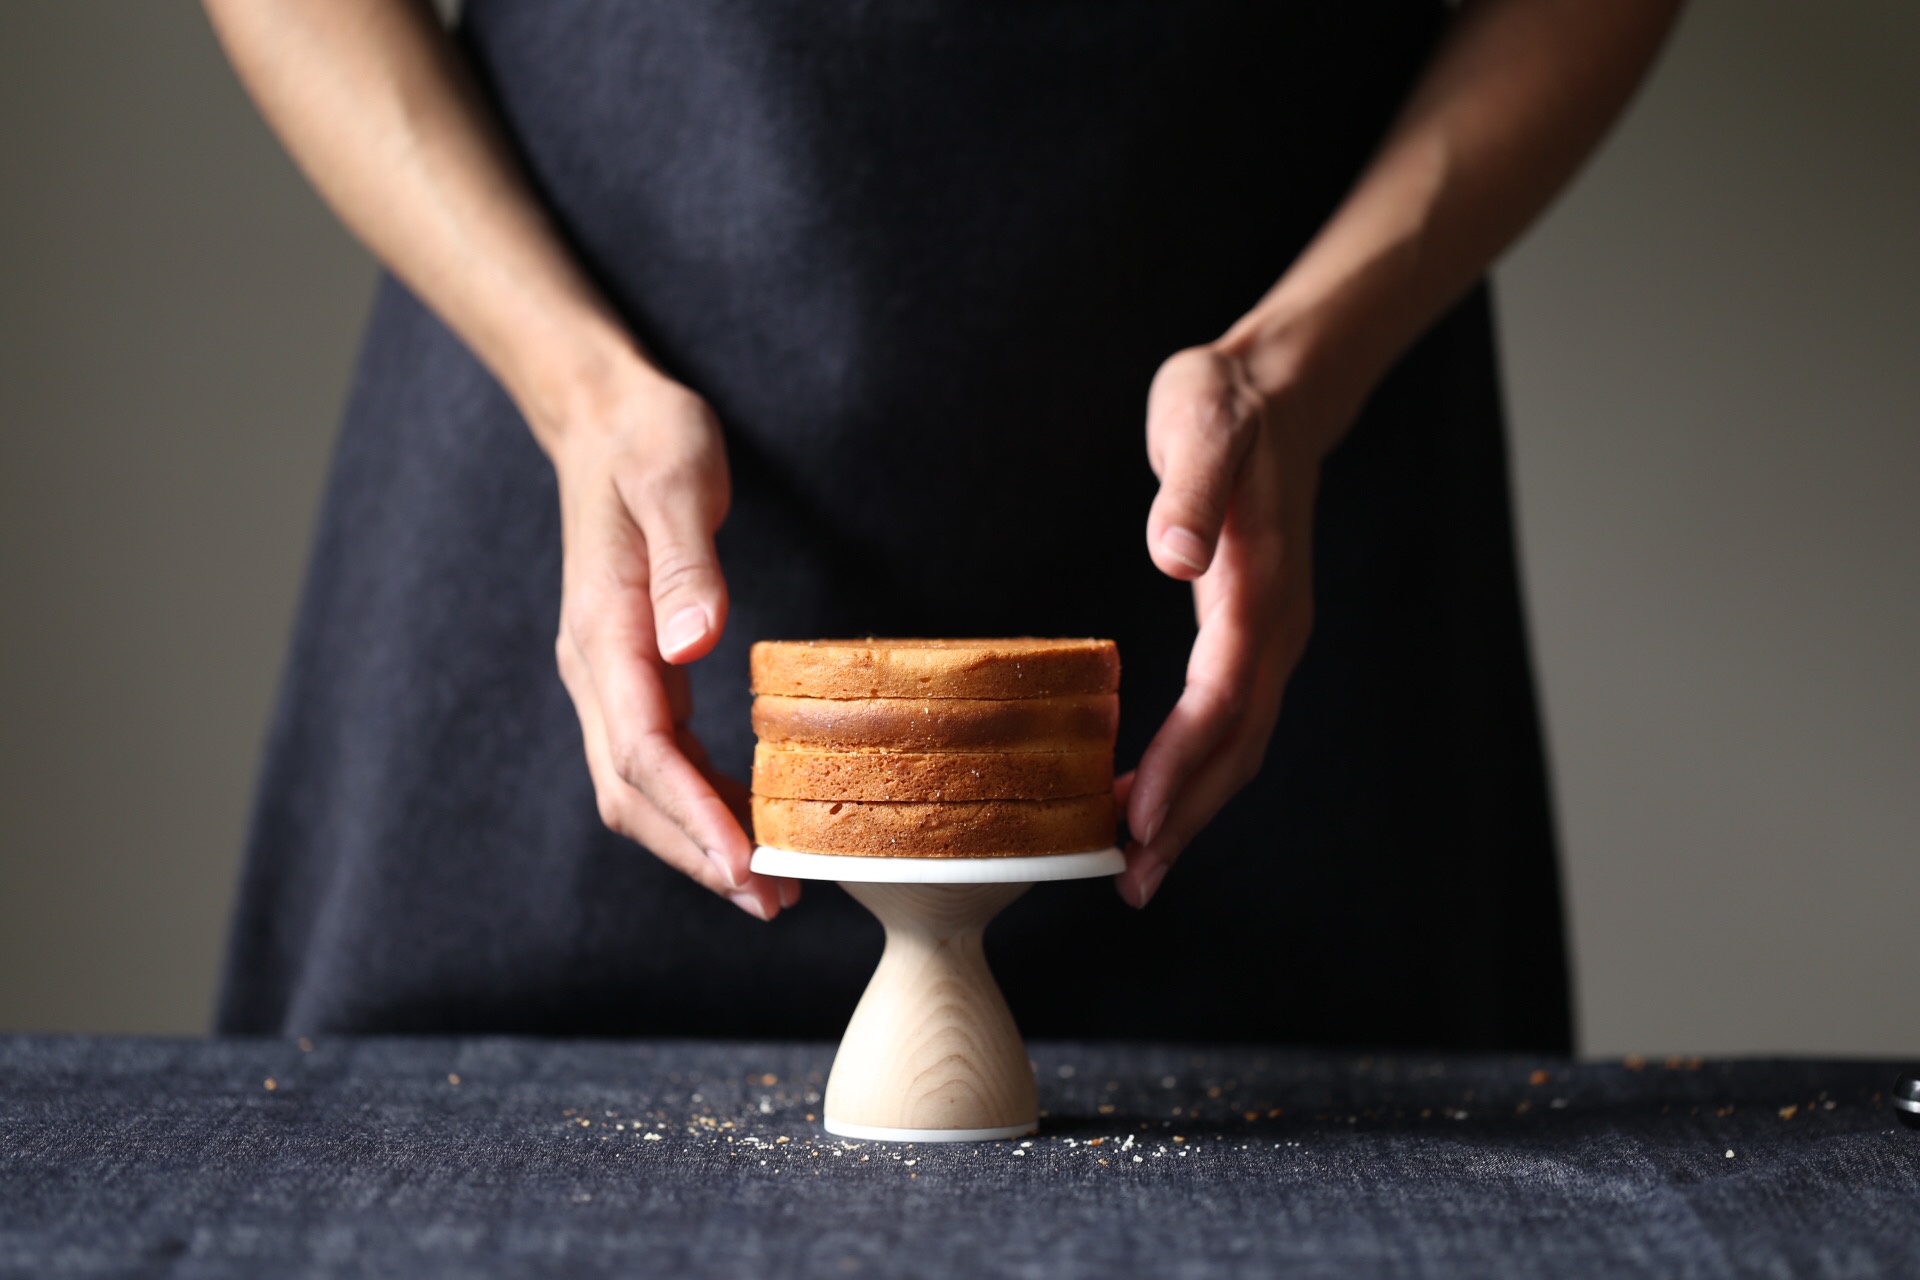
Cakes generally bake with a slight dome shape, which should always be removed prior to dividing your cakes into layers, as it will facilitate neat layers that stack evenly. This process is referred to as ‘levelling’, and is achieved by placing the cake dome-side-up on a small round cake stand or turntable, with one hand flat on the top of the cake to keep it steady, and then cleanly slicing the top off.
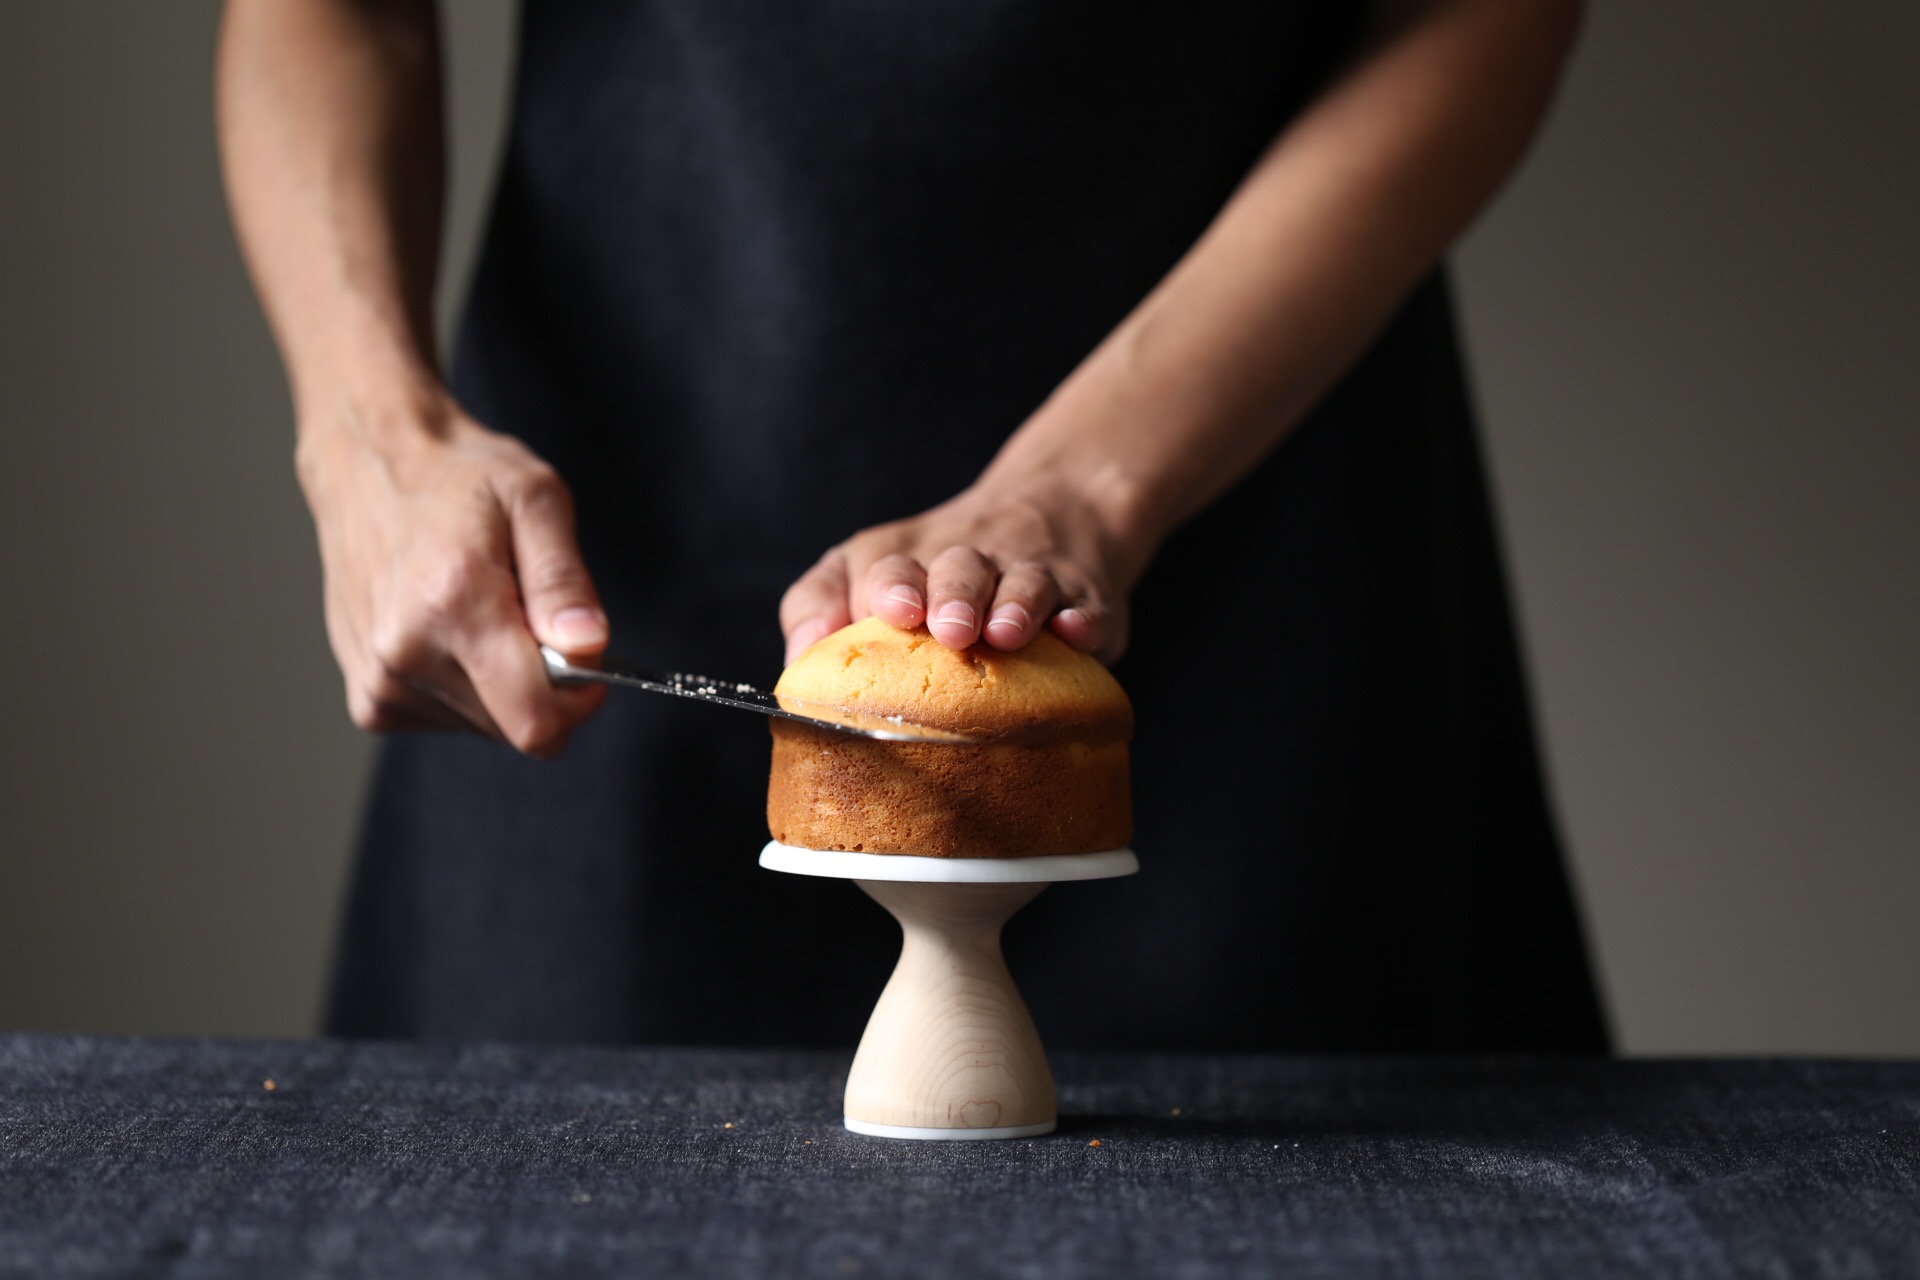 Levelling and slicing your cake into layers is best done with a large serrated knife and a slightly chilled cake; if the cake is warm or at room temperature, it is more likely to crumble, whereas if it is completely frozen, it will be too hard to cut. Special cake levellers are available to facilitate the leveling and slicing process, but I find a large serrated knife does a great job for small to medium sized layer cakes (4-7 inches).
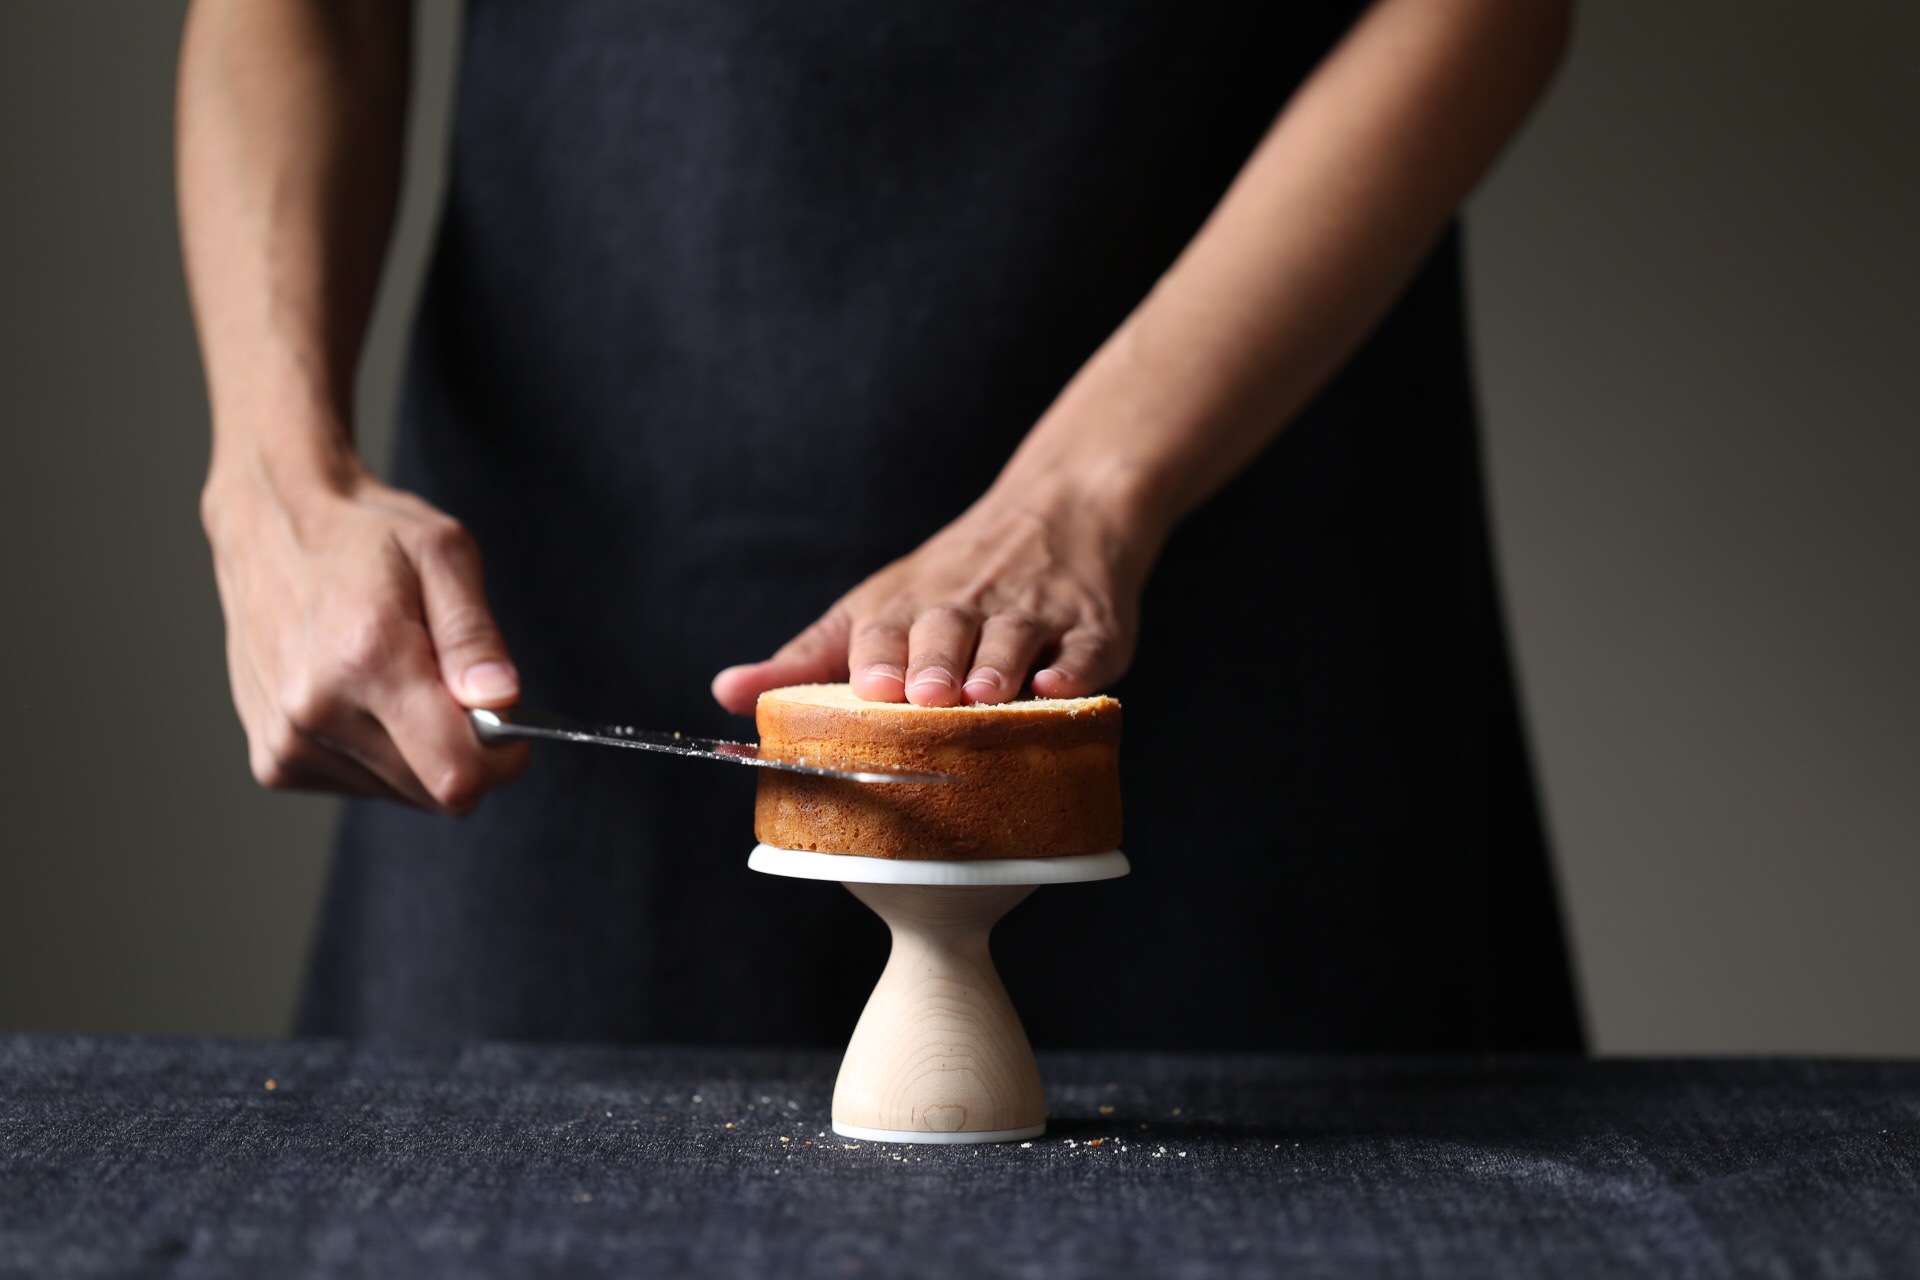 After levelling your cake, slice your cake into layers by measuring the height of your cake and then accurately divide it into two or three layers as required. If you are working with a small or medium sized cake and have a good eye, you may prefer to simply divide it by approximation. Regardless of which method you use, I would recommend lightly scoring the entire circumference of the cake with the knife prior to slicing it, to minimise the risk of cutting the cake lopsided.
 Have a cake board handy
If you will be transporting your cake to another location for consumption, or simply transferring it from one plate to another at any stage (including in and out of the fridge), it is very helpful to have a cake board. Cake boards are circular pieces of thick cardboard that form a sturdy foundation for your cake, and are sold at most specialty cake stores (or you can neatly cut one out yourself). Remember to purchase the cake board in the exact same diameter as your cake if you do not wish for the cake board to be seen when your cake is on display.
Get your layers in order
I like to have my layers stacked ready in the order in which I will be using them. To make frosting easier and more even, I would suggest placing the bottom and top cake layers with the cut side down when frosting. For the bottom layer, this will give the cake a clean finish with the edge of the cake board or plate or stand. For the top layer of the cake, use the cake layer from the bottom of the cake tin, placed cut-side-down to keep crumbs out of your frosting.
 FROSTING YOUR CAKE
The frosting process should be enjoyable, not a stressful affair, so allow yourself a generous amount of time to frost your cake, and be guided by the following suggestions.
Temperature of the cake and frosting
I find it easiest to frost a cake when it is slightly chilled (from the fridge) to prevent crumbling, while the frosting is best at room temperature for easy spreading.
Type of frosting
There are many different frostings available to use for layer cakes, although living in a warmer climate, I have a strong preference for swiss meringue buttercream. This is because the frosting plays a structural role in layer cakes, and swiss meringue buttercream holds its shape a lot better than frostings with a high content of cream or cream cheese or a buttercream made without eggs, all of which can create uneven or leaning cakes in warm weather. Swiss meringue buttercream also has a delicate, velvety texture and can easily be flavoured with whatever you wish to compliment your cake, making it a perfect choice for layer cakes. To get yourself better acquainted with the benefits of and tips in making swiss meringue buttercream, please refer to my post on Swiss Meringue Buttercream Basics.
Dividing your frosting
To ensure equal amounts of frosting between each layer and to have enough to cover the sides of the cake, I find it easiest to divide my frosting into portions at the beginning. Aspects to consider when dividing the frosting into portions include (1) whether the cake is going to be naked or semi-naked or completely frosted, (2) whether you require extra frosting for a frosting ‘dam’ to keep in any filling (see filling tips below) or (3) whether you will be using any frosting for decorative swirls or blobs on the top or sides of your cake. If for example, I was to make a completely frosted four-layer cake with a lemon curd filling inside, I would divide my frosting roughly into eight portions – one portion per layer including the top of the cake, one portion to account for three frosting ‘dams’ and three portions for the sides of the cake. You may not need the full three portions for the sides of the cake, but I always prefer having a little leftover at the end rather than running short right at the end.
Please note that all my recipes include enough frosting to cover and decorate my cakes as shown in my images. If you wish to change the appearance, for example you would prefer to completely cover a cake that I have left naked, remember to make extra frosting to account for this alteration.
The frosting process
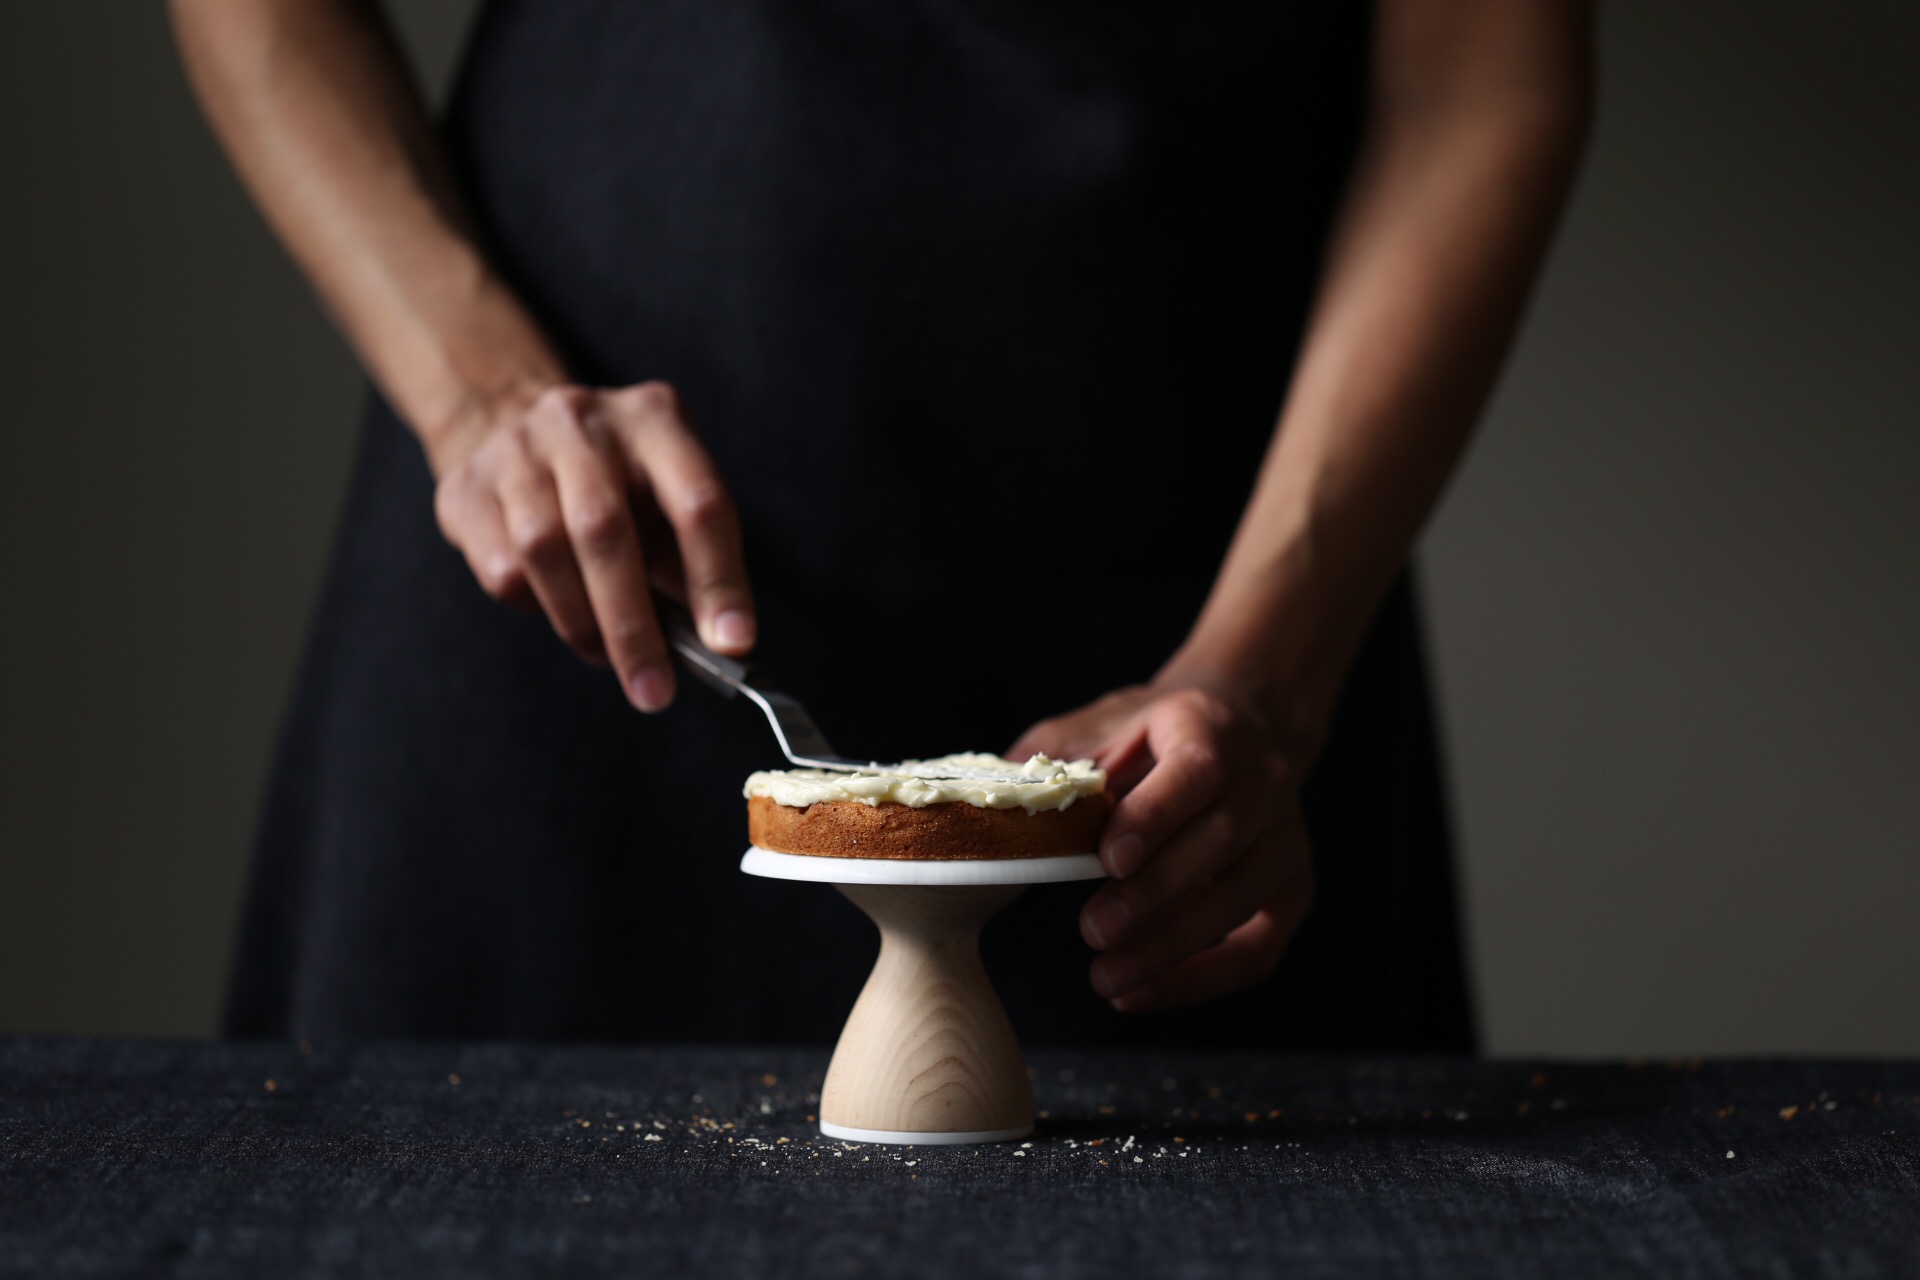
To frost the cake, place the first layer of your cake on a cake board on top of a cake stand or turntable, cut-side-down. Using an offset palette knife, evenly smooth the first portion of frosting across your first cake layer.
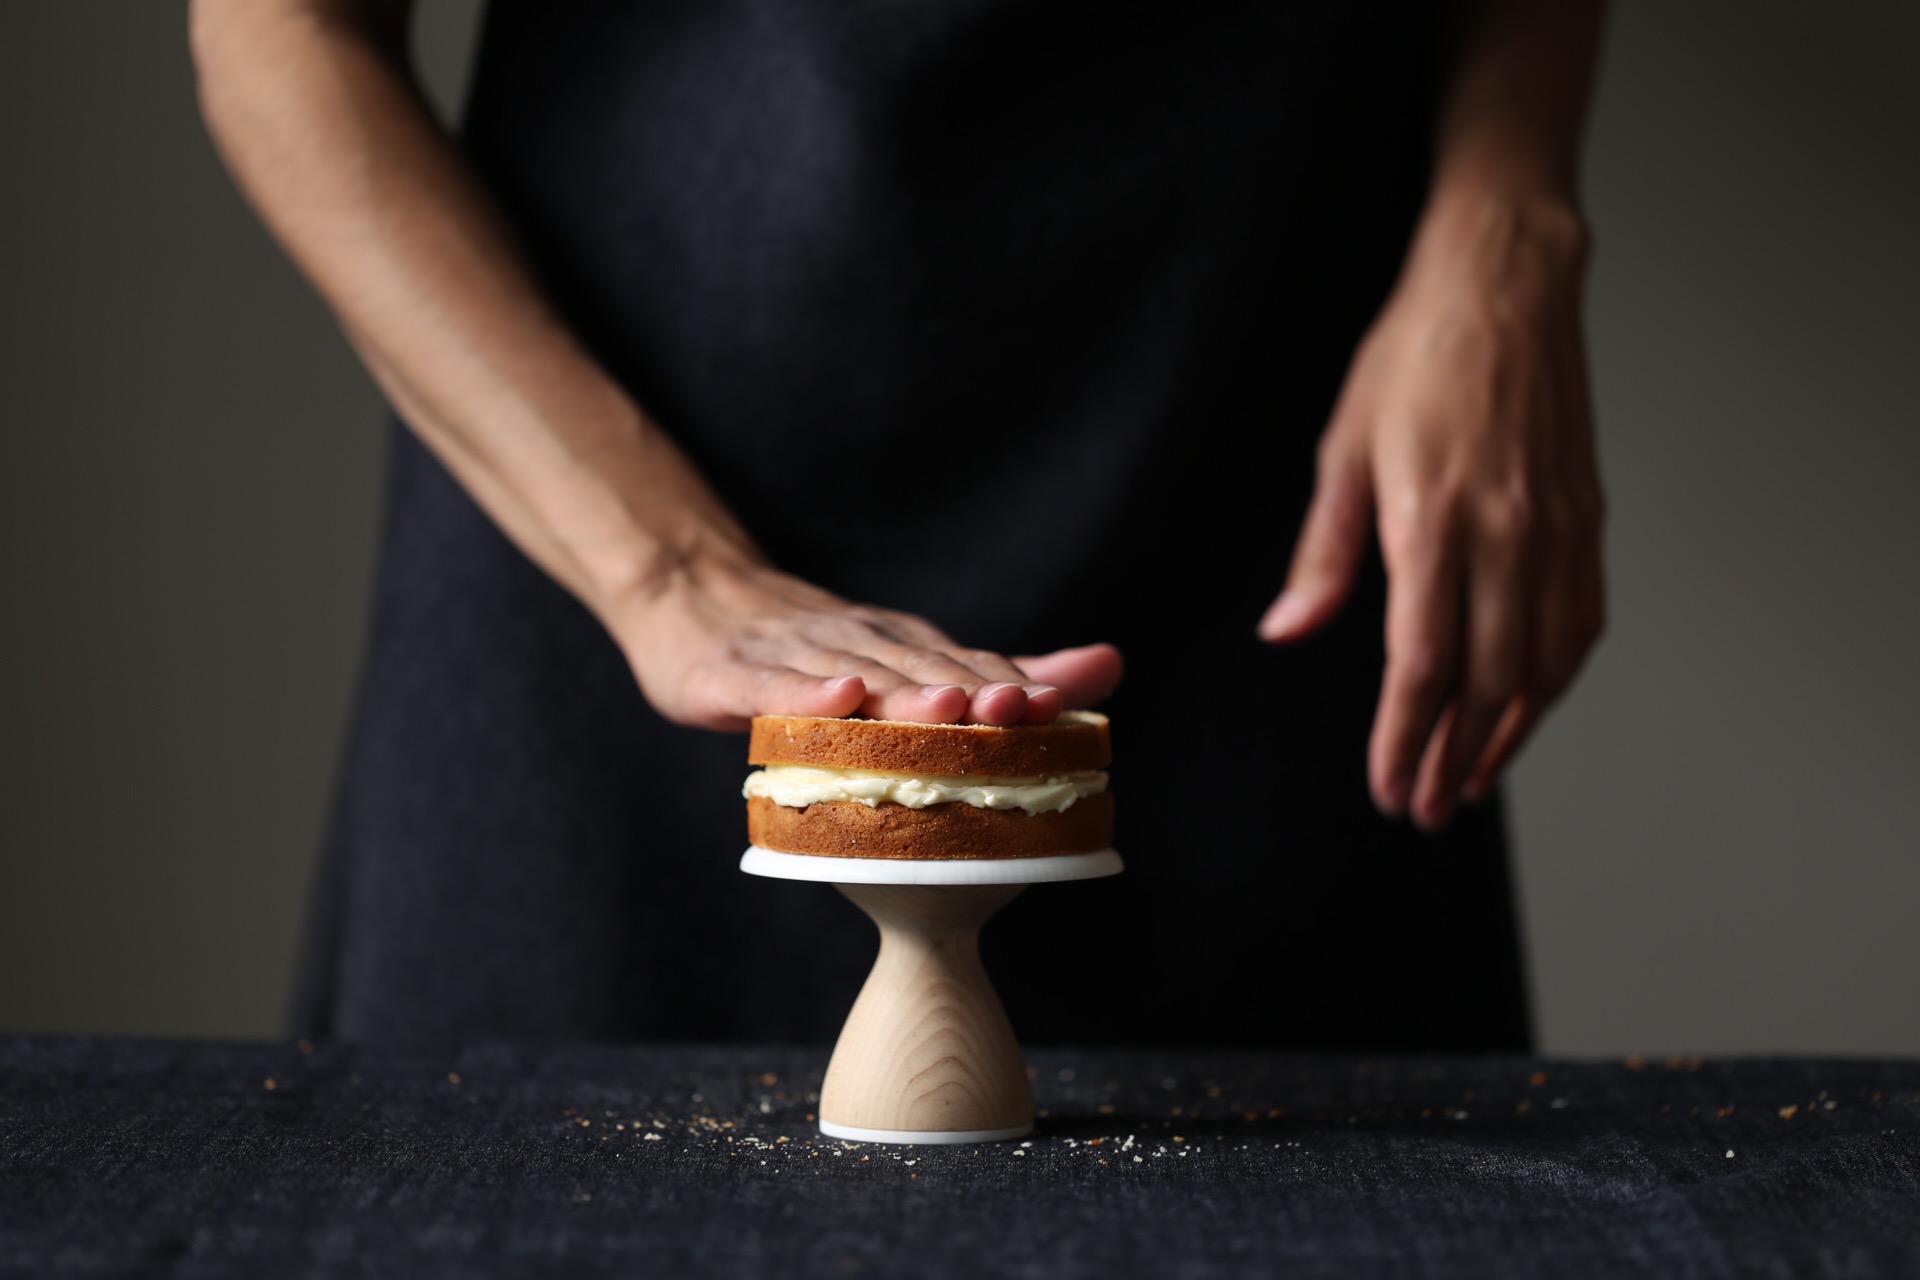
 Place the next layer on top, and press gently and evenly on the cake to ensure the second layer has settled well on top of the first layer of cake and frosting.
 Repeat the process with each layer, alternating cake and frosting, and ensuring gentle pressure each time you place a new cake layer on top.
 For the final top layer of your cake, ensure you use one of the bottom cake layers, placed cut-side-down, and at this stage, a flat plate or upside-down cake stand can be helpful to apply gentle even pressure on the entire top surface of the cake. This process allows the cake to settle from the beginning, so you aren’t left with any leaning cake surprises later when your layers have had time to succumb to the effect of gravity.
 Cover the top of your cake with frosting, and if you are making a completely naked cake, the frosting process is now complete!
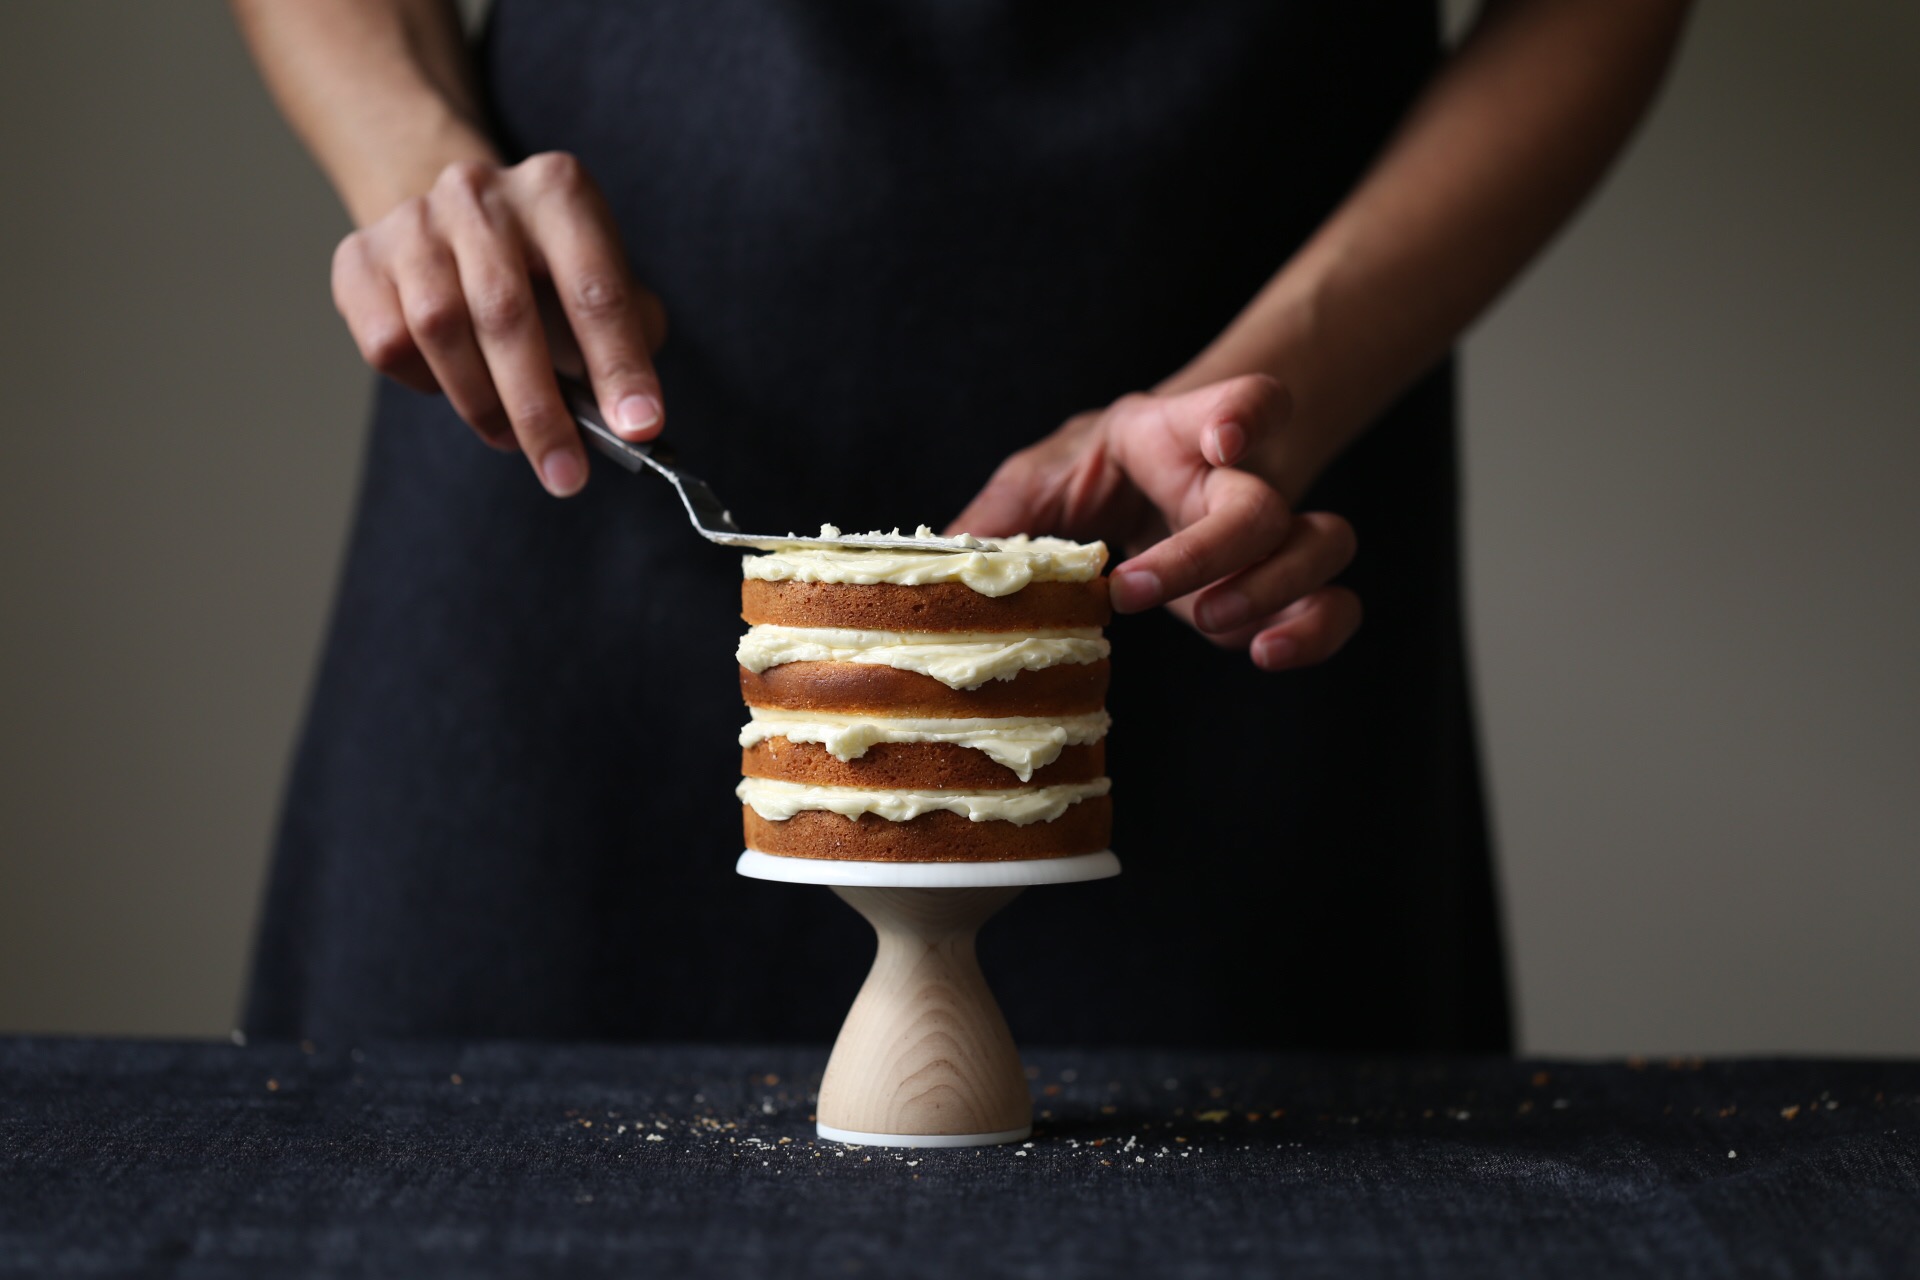 Keep in mind by using the method above, you will have a somewhat rustic naked cake, with little blobs of frosting oozing out the edges. If you are after a super neat naked layer cake, I suggest piping the frosting around the edge of each cake layer instead. If you are making a semi-naked cake with a ‘white-wash’ appearance, place small amounts of frosting here and there on the sides of your cake and smooth over with an offset palette knife.
To completely frost your cake, cover the cake top and sides in a very thin layer of frosting and smooth over using an offset palette knife. It doesn’t matter if you can see hints of cake peeking out from under your frosting, as you will cover them up later. Place the whole cake in the fridge for about 20-30 minutes, until the first layer of frosting has firmed up. The frosting shouldn’t stick to your finger when touched gently on removal from the fridge, otherwise leave it to chill a little longer. This layer is usually referred to as the ‘crumb coat’ and by chilling it in the fridge, it locks in all the cake crumbs, preventing them from spoiling your final coat. Repeat the process of covering the cake in a layer of buttercream and smoothing over with the offset palette knife. If you are happy with your smooth crumb free finish at this stage, frosting is now complete! If you want a smoother finish or need to cover up any other sections of cake, you can place the cake back in the fridge and repeat with a third layer of buttercream.
FILLING YOUR CAKE
Layer cakes sometimes consist of a different filling (such as curd or jam) in addition to the frosting used for the rest of the cake. These fillings often contribute a key flavour aspect, but can make the layering process a little more challenging as you strive to prevent the filling oozing out the edges of your cake (unless that’s the look you’re going for of course!).
Filling consistency
Getting the filling consistency accurate is essential when making a layer cake; if the filling is too runny, it will create a messy affair both when assembling and cutting your cake. I find the easiest way to know whether or not the consistency is right, is by observing your filling at room temperature. Place a spoonful of filling on a plate and if it maintains its shape in a semi-solid neat blob, it’s the right consistency. If it is fluid and runs across the plate, it’s too thin, and I would suggest placing the entire batch of filling in a small saucepan on the stove and cooking it further on a low heat until it thickens. Allow it to cool and then reassess the consistency.
Piping a ‘dam’ of frosting
In addition to right consistency, creating a ‘dam’ of frosting will also keep your filling inside your cake. To do this, place a small amount of frosting in a piping bag with a small round nozzle and pipe a continuous circle of frosting around the edge of each cake layer. The raised edge of frosting will act as a barrier to unwanted filling drips.
 Spoon a small amount of filling in the centre of the cake and spread it to the edge of the frosting dam. Take care not to overfill your cake otherwise even the frosting dam won’t be able to keep the filling from oozing out or prevent the layers from sliding.
 DECORATING
All your hard work has paid off and now comes the best part of making a layer cake – decorating your beautiful creation.
Drips
Cakes dripping with a chocolate glaze or salted caramel always look incredibly inviting and are fairly easy to accomplish provided the consistency and temperature of your drizzle is right. If your drizzle is too hot and runny you’ll be left with a cascading waterfall down your cake and puddles of melted buttercream, whereas if it’s too cold and thick, there won’t be any drips happening at all. I find it easiest to work with a drizzle that is slightly warm, and thick yet still fluid.
There are two slightly different methods for achieving cake drips, depending on what look you are after. If you’d like a more rustic, natural appearance, I’d suggest slowly pouring your drizzle onto the centre of the cake, then nudging it over the edge in sections intermittently with the back of a teaspoon to create drips of various sizes. If you would like a neater drip appearance, you can pipe or spoon your drips along the edge of your cake first, then finish by covering the top of the cake with the remaining drizzle and smoothing over with an offset palette knife.
Piping decorative frosting
A lot of layer cakes are beautifully finished by piping frosting over the sides and top of the cake using a multitude of techniques. I’m no piping expert by any means so this is well beyond the scope of this post. One of my favourite cake bloggers, Tessa Huff, has some gorgeous tutorials and techniques that are worth checking out if you want a few more tips in this area.
Get creative
Your layer cake will look amazing piled high with just about anything. Some of my favourite decorations include meringue kisses, macarons, fresh or freeze dried berries, toffee shards, and chocolate-coated coffee beans.
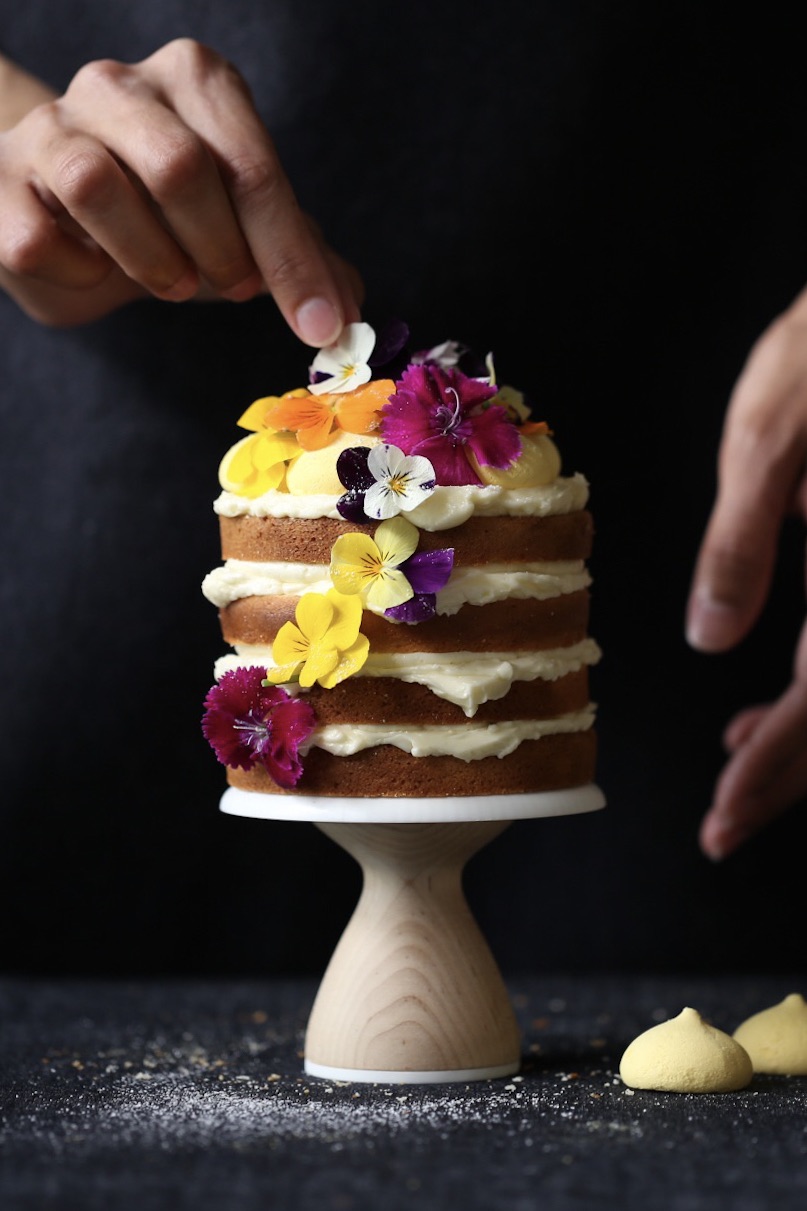
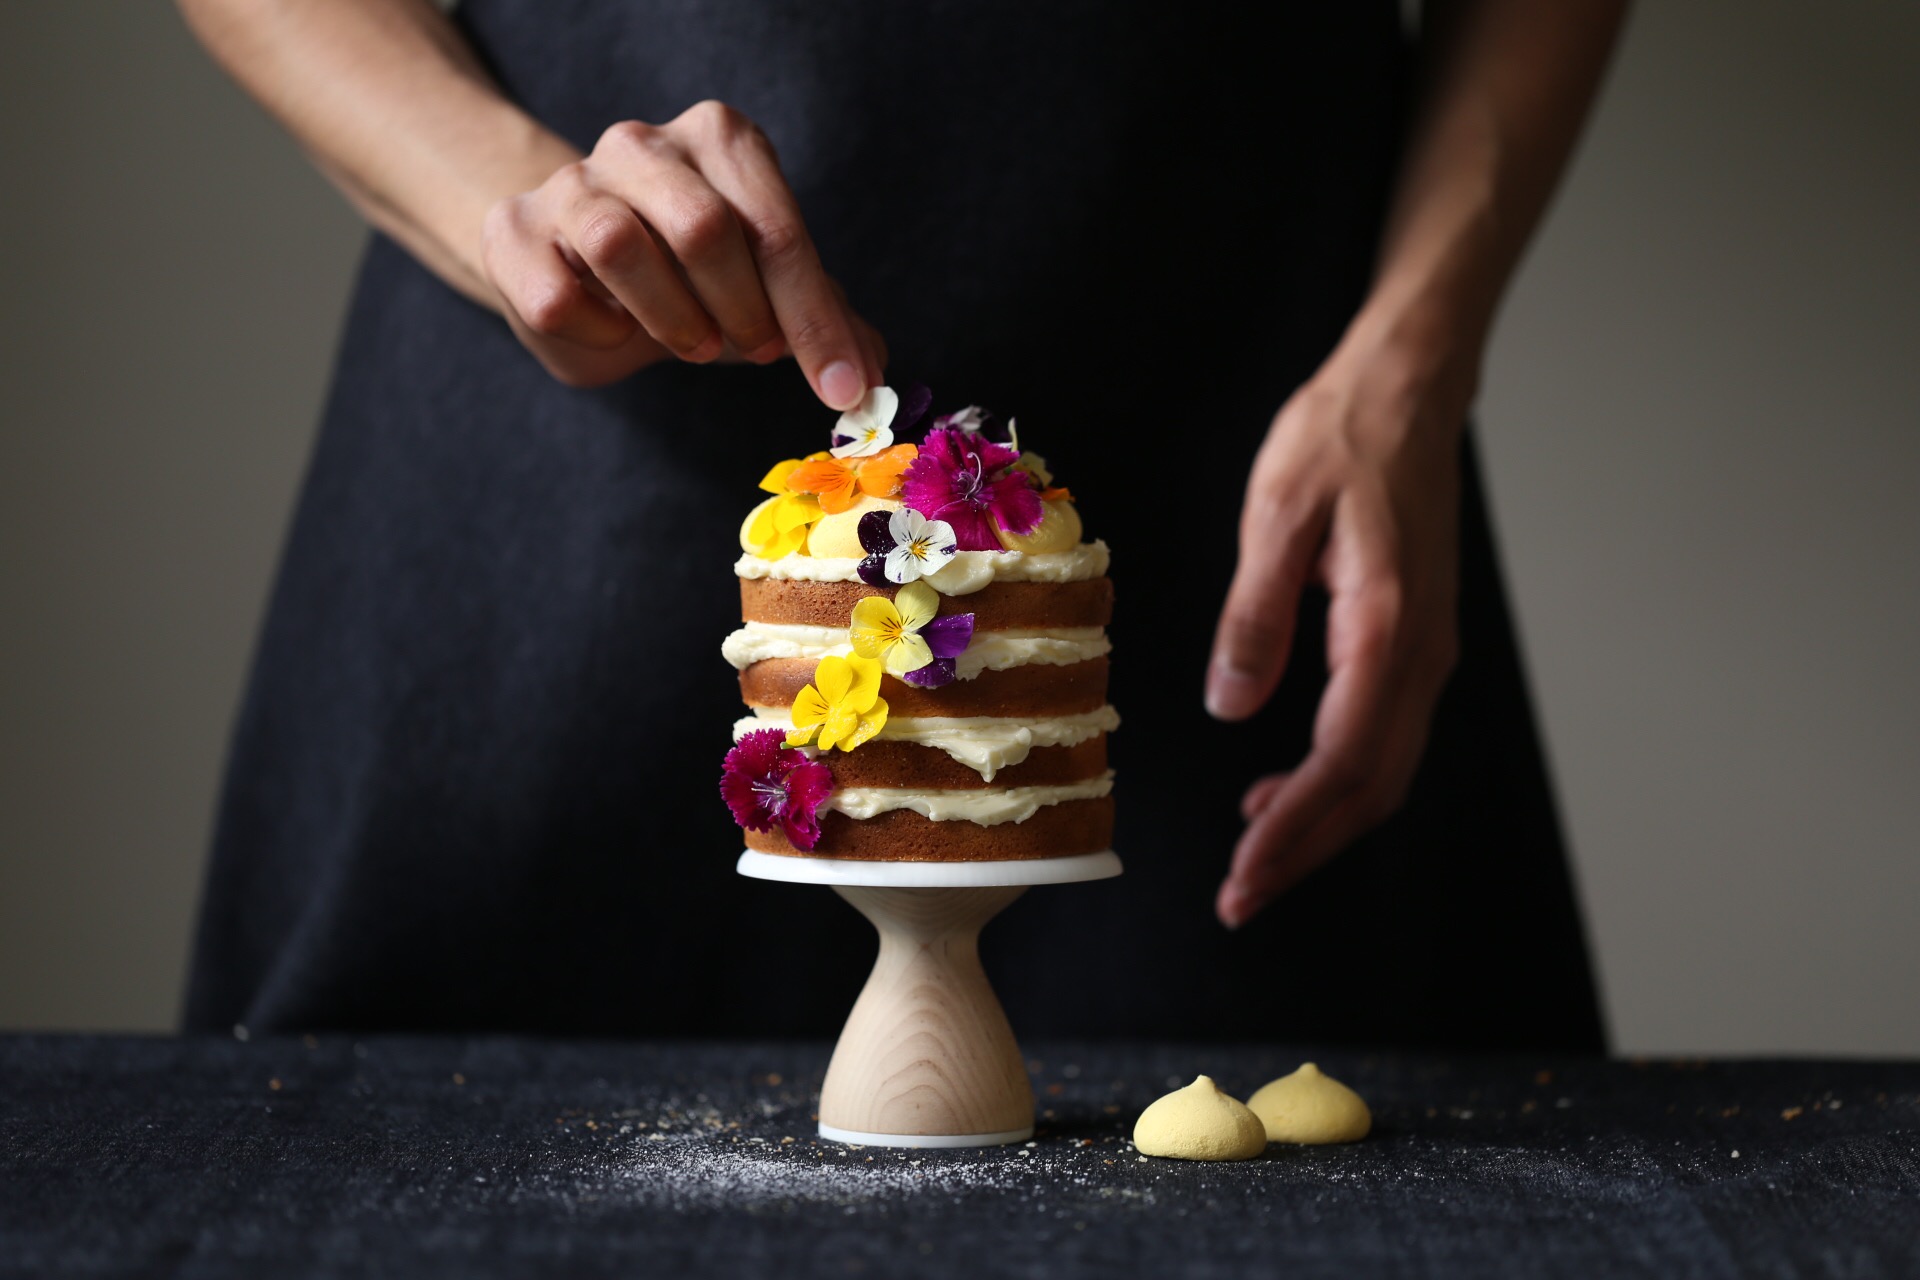
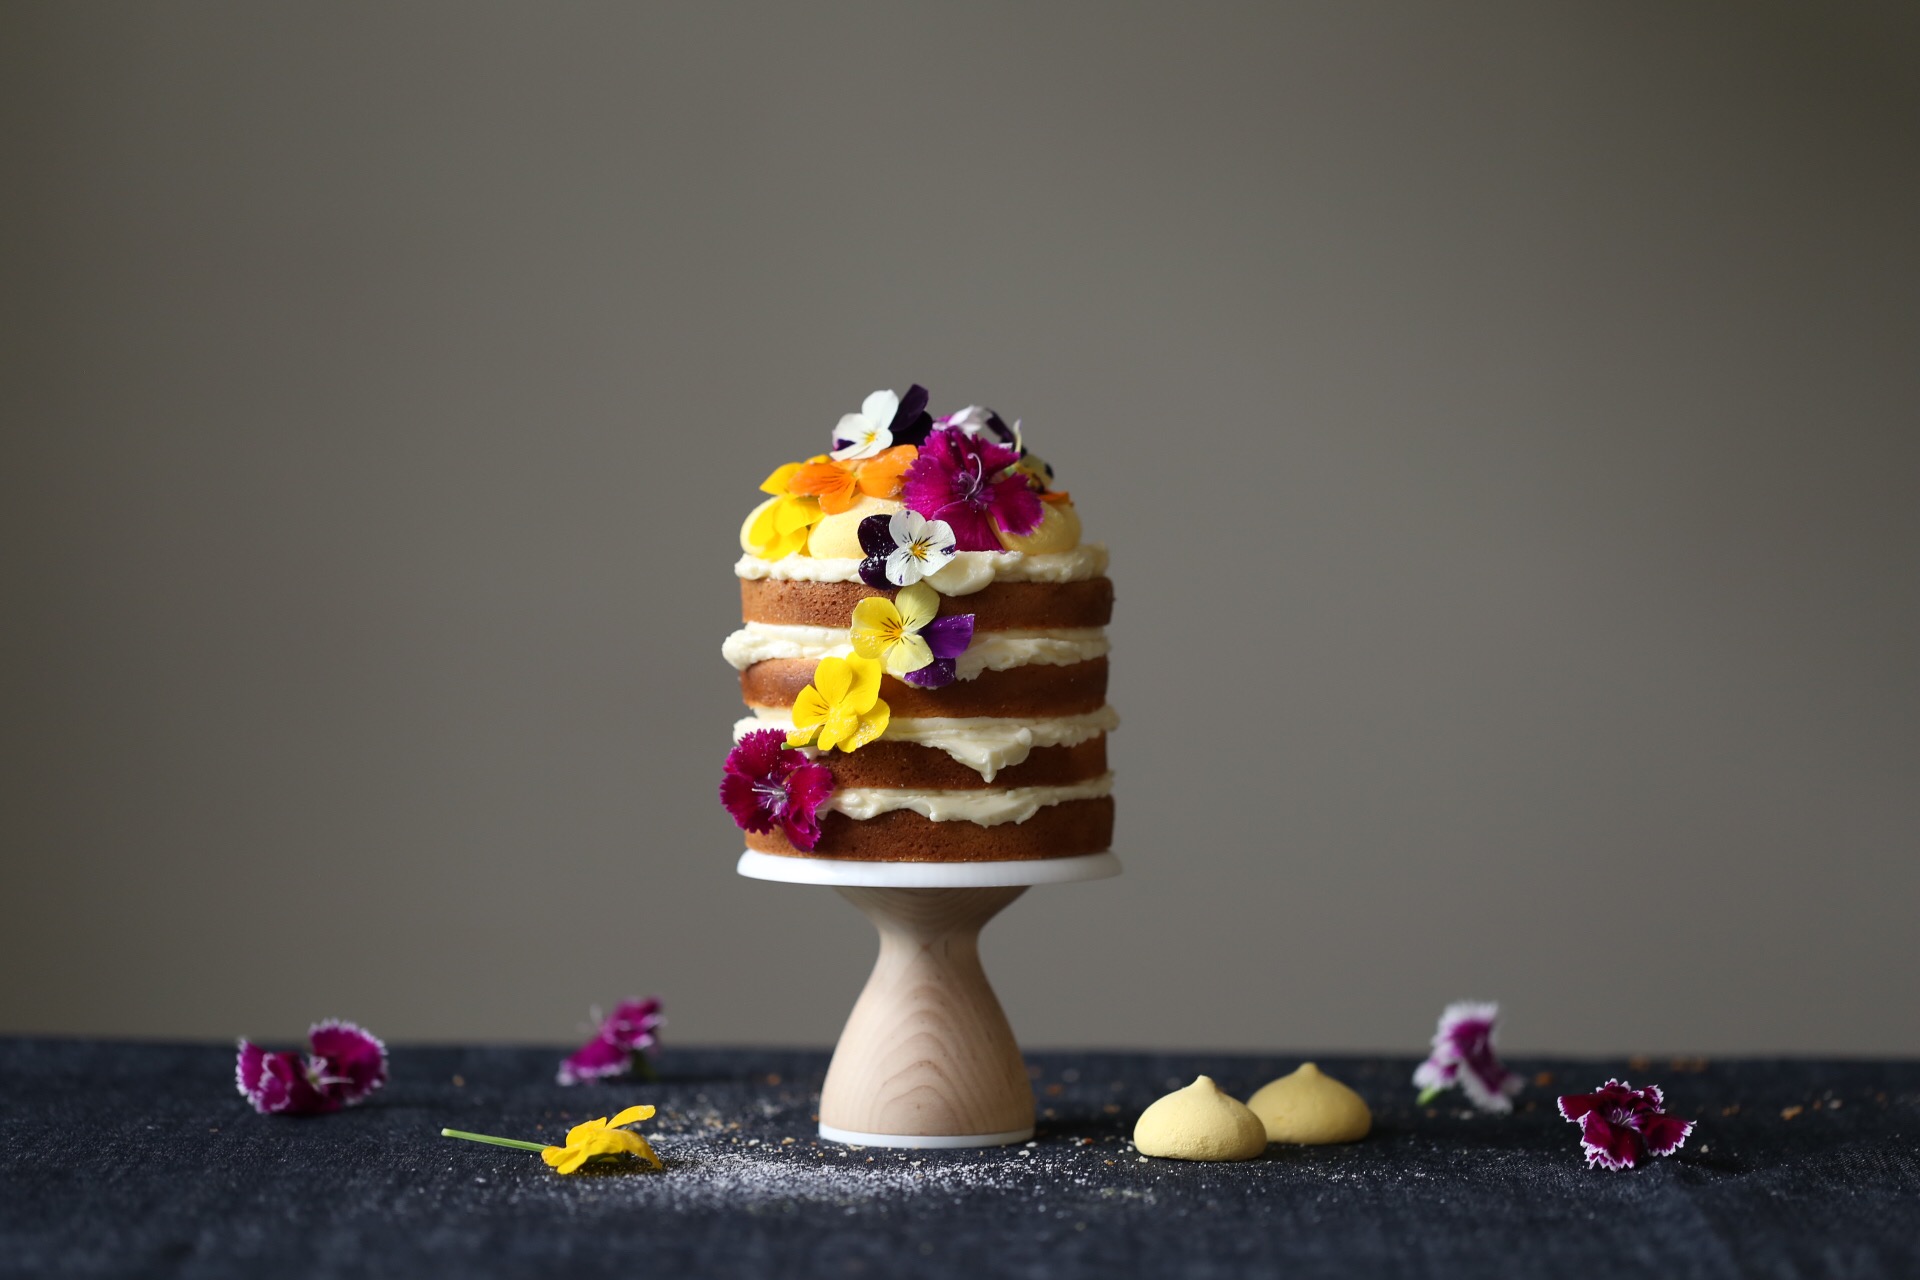
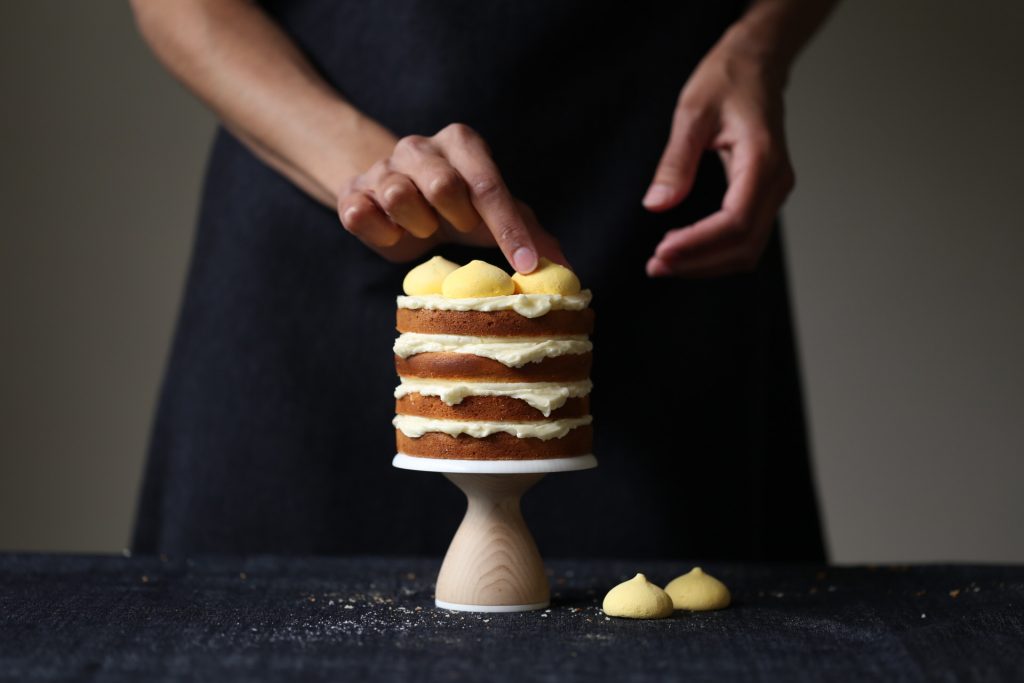 Fresh flowers transform any naked cake into a gorgeous work of art. Small edible flowers or large bouquets both look stunning, just ensure they are free from any pesticides if they will be coming into contact with your lovely cake.
 Mini cake bunting is also a great choice for celebration cakes and very easy to make with pretty ribbon, bakers twine, a couple of wooden skewers and double-sided sticky tape. Lastly, a light dusting of sifted icing sugar, cocoa or cinnamon often provides the finishing touch for your stunning masterpiece.
SERVING
You’ve worked hard to create the perfect layer cake, so do it justice when serving. Ensure the cake has had time to set before cutting it. I like to chill my layer cakes in the fridge for a few hours after they are made, to allow the flavours time to develop and the layers time to set together so the cake slices easily. When it comes to actually serving your cake though, it will taste best at room temperature. To cut neat cake slices, use a sharp knife dipped in hot water then wiped clean. Bring out the special china to serve those delicious layers and enjoy devouring your beautiful creation!
Credits and Sources
Mini wooden cake stand from American Heirloom
The process of constructing a paper collar for lining cake tins was adopted from Lomelino’s Cakes by Linda Lomelino
I was delighted to use meringue kisses from Asterisk Kitchen to decorate this layer cake, after receiving the product as a sample. I did not receive any monetary compensation for the use of the product, and all opinions expressed are my own and not influenced in any way.
This is so helpful! I love it! Thank you Salma Sabdia!
You are most welcome Zainab 🙂
Thank you so much for this – so helpful !
Your cakes look amazing, I can’t wait to get baking -I love your photos too 🙂
Thanks very much for the lovely sentiments Olivia 🙂
So so helpful and looking lovely!
Any chance you have a recipe for that mini layered cake? Would love to practice baking a a small one first before attempting a regular sized one!
Hi Aileen, thanks for your lovely comments and query. This mini layered cake is a 10cm (4″) version of my Lemon Curd and Coconut Cake. Unfortunately I didn’t record the exact measurements/oven temperature I used when I converted it to this smaller version. If you are looking to start with a layer cake this size, you are welcome to refer to this recipe, which also uses 10cm (4″) pans: Dark Chocolate Peppermint Brownie Cake. Happy baking!
Thank you SO much for this post! I found your cakes on instagram and have been following you ever since! I bought my own set of tiny springform pans and I am about to frost my birthday cake I made. Fresh Strawberry Cake with Brown Butter frosting. Thanks for all the handy tips! <3
Thanks for the lovely comments Amanda! So glad to hear you found this post useful. Fresh Strawberry Cake with Brown Butter frosting sounds amazing, hope you had a lovely birthday 🙂
Hi! This post is super useful. Can I ask whether it’s okay for any sponge to go in the fridge? When I firSt tried this I found when we came to eat the cake the sponge was a bit dry – is that affected by being in the fridge??
Hi Niki, so glad to hear you found this post helpful and thanks for the query. I would recommend wrapping the cakes in cling film when un-iced to avoid them going dry. After you’ve frosted your cake, you can still place it in the fridge although if you are frosting it in a naked style, I would recommend keeping it in a large airtight container to prevent it drying out. If the whole cake is completely frosted in two or three layers of buttercream this often helps keeping the moisture in the fridge, but an airtight container still can help keep other food fridge smells out of your cake. Hope this helps.
Regards, Salma