• Skip to primary navigation
  • Skip to main content
  • Skip to primary sidebar

The Polka Dotter

Baking a bit of beauty into every day

  • Home
  • About
  • Recipe Index
  • Portfolio
  • Pink Ribbon Afternoon Tea
  • FAQ
  • Contact

Earl Grey + Salted Caramel Brownies

September 16, 2018 by Salma 8 Comments

Earl Grey + Salted Caramel Brownies | The Polka Dotter
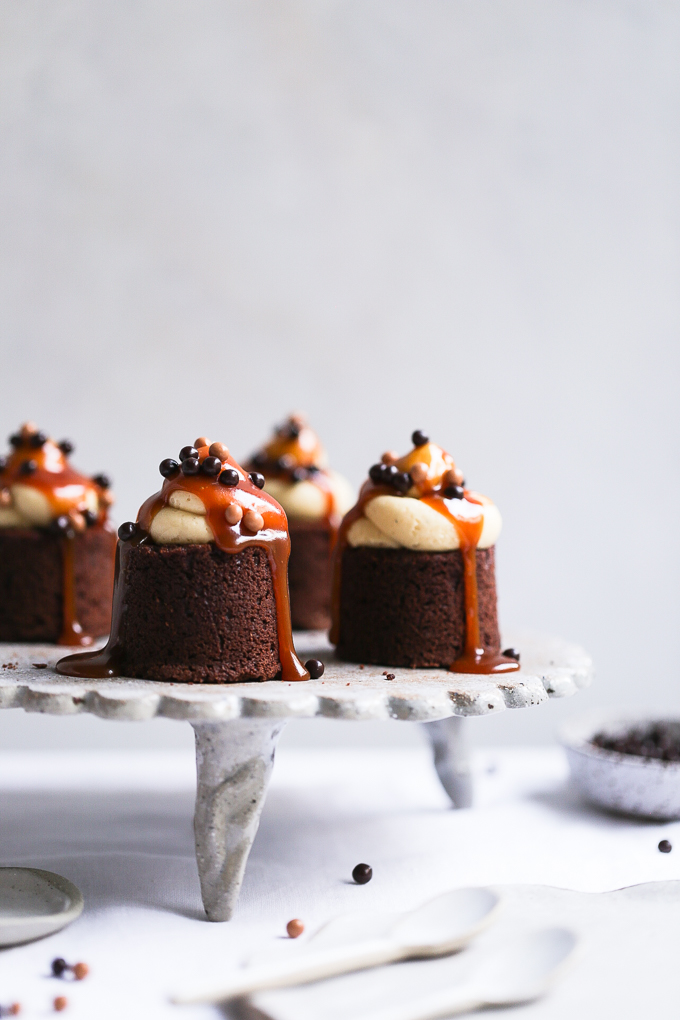
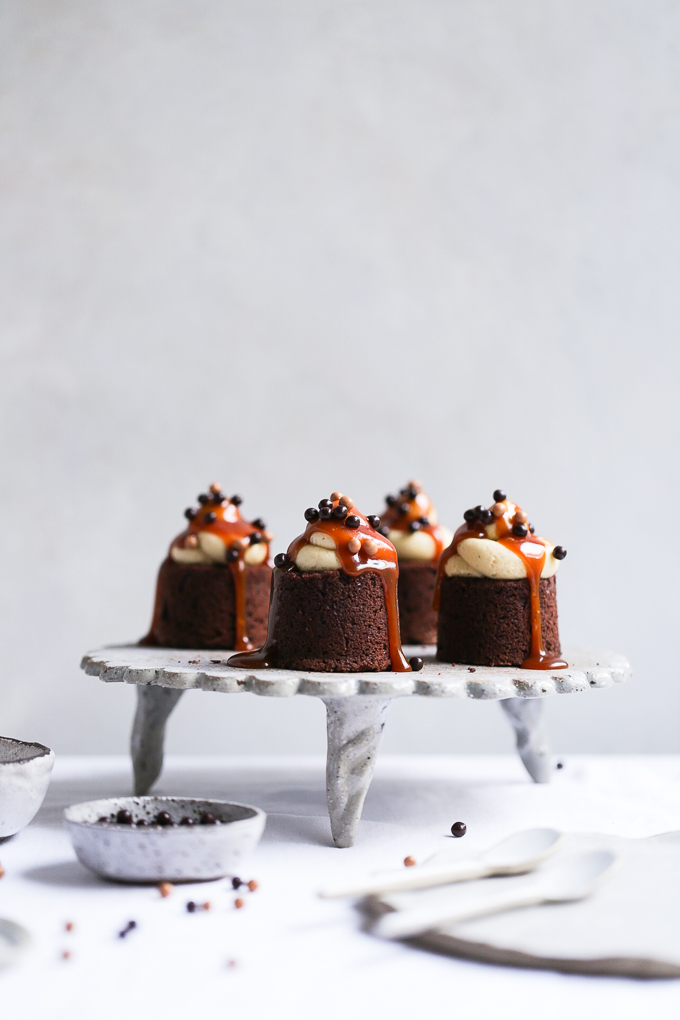
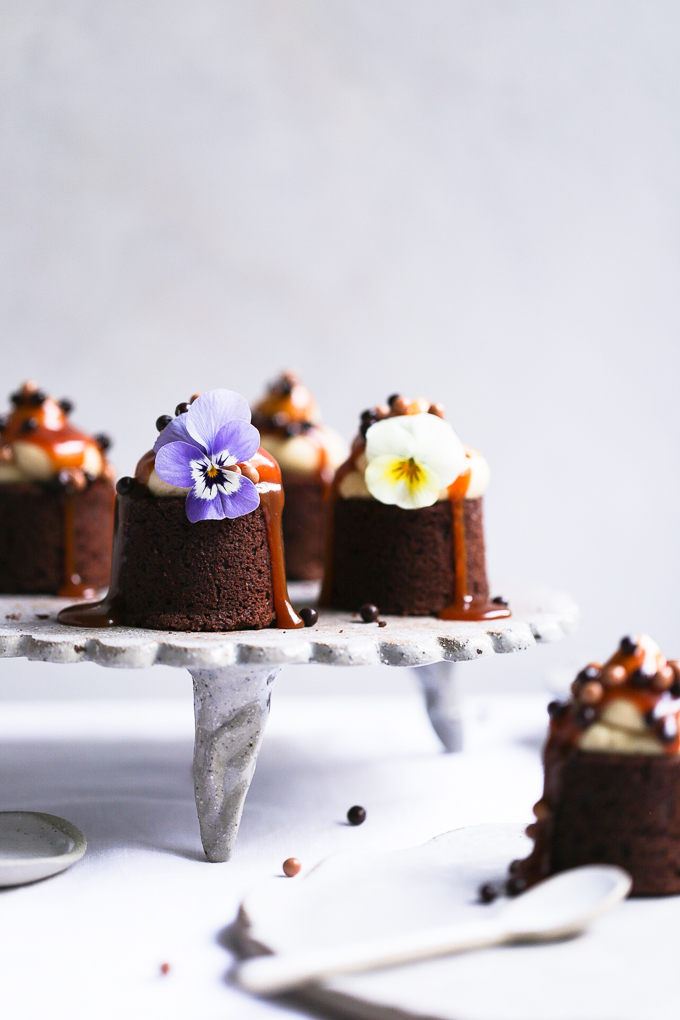
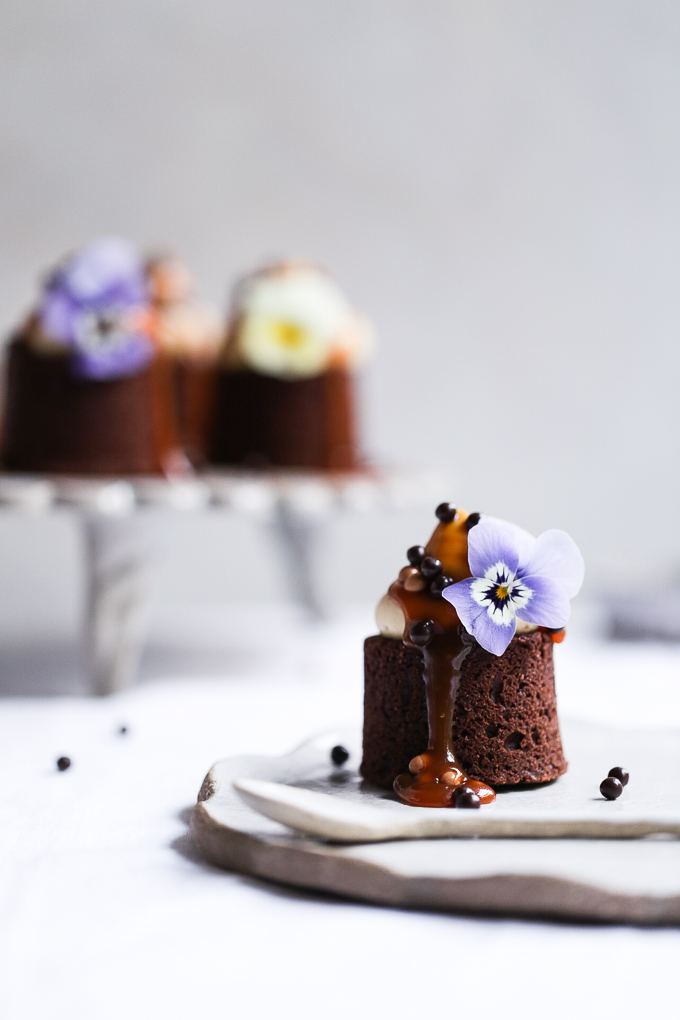
I love individual brownies – they turn a classic into a showstopper, especially when frosted with earl grey buttercream, dripping with salted caramel sauce, dotted with caramel and chocolate pearls and adorned with edible flowers. The frosting infused with earl grey provides a lovely fragrant backdrop for the salted caramel drizzle, while the pearls add a little crunch.

The key is to make sure the brownies don’t overbake – you want the centre moist and fudgy. Compared to classic brownies baked in a large pan, they are at a much greater risk of overbaking due to their size, so if in doubt – take them out early. These brownies require a little more preparation than your average brownie, but they are certainly well worth the effort for the delectable combination of chocolate, earl grey and salted caramel.

Earl Grey + Salted Caramel Brownies | The Polka DotterEarl Grey + Salted Caramel Brownies | The Polka DotterEarl Grey + Salted Caramel Brownies | The Polka Dotter

Print

Earl Grey + Salted Caramel Brownies

Print Recipe

★★★★★

5 from 2 reviews

Makes 12 individual (5cm) brownies

Ingredients

Scale

Ingredients

Chocolate Brownies

  • 100g unsalted butter
  • 100g good-quality dark chocolate
  • 100g (1/2 cup, firmly packed) brown sugar
  • 75g (1/3 cup) caster sugar
  • 2 large eggs, at room temperature
  • 150g (1 cup) plain flour, sifted
  • 3 tbsp dutch-process cocoa, sifted
  • 1/2 tsp baking powder, sifted
  • ¼ tsp fine sea salt
  • 1/4 cup salted caramel sauce, to decorate
  • Chocolate and salted caramel pearls, to decorate
  • Edible flowers (violas), to decorate

Earl Grey Frosting

  • 4–6 earl grey teabags
  • 1 tbsp (20ml) boiling water
  • 2 tbsp (40ml) whole milk
  • 80g unsalted butter, softened
  • 160g icing sugar, sifted
  • ¼ tsp vanilla paste
  • Pinch fine sea salt

Instructions

Method

Earl Grey Brownies

  1. Preheat oven to (170°C/150°C fan-forced) and grease a 12-hole mini cheesecake pan (or mini cake pan).
  2. Melt butter and dark chocolate in small saucepan on low heat until smooth, then set aside to cool for 10 minutes.
  3. Beat eggs and sugars until pale and smooth, then pour in melted chocolate mixture until combined.
  4. Add 1/3 of the sifted plain flour and gently beat on low speed to combine, then the rest of the flour, cocoa and baking powder and salt, until mixture is smooth. Take care not to overmix.
  5. Divide mixture equally between cake pan holes then bake for 16-18 minutes or until brownie top springs back when touched, and a cake tester comes out with moist crumbs. Don’t be tempted to leave the brownies in the oven any longer – they will firm up as they cool and taste much better with a moist centre than being hard and crunchy. Allow to cool 10 minutes in pan, then turn out and cool completely on a wire rack.

Earl Grey Frosting

  1. Cover teabags with boiling water in a small bowl, then add milk. Allow to steep for at least 30 minutes. When ready to use, remove teabags, squeezing to extract maximum flavour
  2. Whisk together butter, sugar, vanilla and salt in a freestanding mixer on high speed until light and fluffy, then add earl grey infused milk and continue to whisk until pale and fluffy.
  3. Place frosting in a piping bag fitted with a medium round nozzle. 

Assembly

  1. Place brownies on serving plate, then pipe with frosting and drizzle with salted caramel sauce.
  2. Sprinkle with chocolate and salted caramel pearls, then decorate with edible flowers.

Notes

You can find the recipe for the most delectable salted caramel sauce here, or you may prefer to substitute with your favourite store-bought salted caramel sauce, found at most speciality food stores.

Did you make this recipe?

Tag @thepolkadotter on Instagram and hashtag it #polkadotbakes

Earl Grey + Salted Caramel Brownies | The Polka Dotter
You may also like:
Chocolate Earl Grey Tart + Sea Salt (gf)
Chocolate Salted Caramel Brownie Cake + Fresh Figs
French Earl Grey Bundt Cake

Filed Under: Cupcakes, Mini Cakes & Brownies Tagged With: Chocolate, Earl Grey, Salted Caramel

Previous Post: « Blood Orange Chocolate Cake
Next Post: Blood Orange and Rosemary Teacakes »

Reader Interactions

Comments

  1. jan

    September 17, 2018 at 3:55 am

    These look delicious! Can you share a link for the pan you used?

    Reply
    • Salma

      September 17, 2018 at 11:04 am

      Hi Jan,
      Thanks for asking. For this recipe I’ve used a 12 hole mini cheesecake pan by Chicago Metallic. I purchased it from a local kitchenware store years ago but you can probably track down a similar (or the same) one in your area or online.
      Good luck and happy baking, Salma

      Reply
  2. N.moolla

    September 17, 2018 at 8:36 am

    Hi/Salaam
    What is the name or type of baking pan that u have used here?
    These cakes are so adorable in these shapes!!:)

    ★★★★★

    Reply
    • Salma

      September 17, 2018 at 11:06 am

      Hi Naeema,
      Thanks for the lovely comments. I do love the sweet miniature shape! See my response to Jan’s question 🙂 good luck tracking it down and happy baking!
      Kind regards, Salma

      Reply
  3. Debbue

    June 7, 2020 at 3:35 pm

    A beautiful recipe and picture to replicate. I used a different pan and made the fatal mistake of overcooking them. I will know for next time. I made your caramel sauce too. Delicious.

    ★★★★★

    Reply
    • Salma

      June 7, 2020 at 9:08 pm

      Thanks for the comment and so glad to hear you enjoyed the caramel sauce. Don’t worry about overcooking the brownies – it happens to all of us! Good luck for next time – and if in doubt, take them out earlier and if they are underdone, everyone will love the gooey fudgy centres, and you can pretend it was all planned.

      Happy baking! Salma

      Reply
  4. Olivia Lai

    April 12, 2023 at 4:30 pm

    Amazing recipe! Thank you! The cake stand and plates are so interesting. May I know where you got them from?

    Reply
    • Salma

      April 16, 2023 at 3:23 pm

      Hi Olivia,
      I’m glad to hear you like my recipe and thanks for your query. The cake stand and plates are from two of my favourite Australian ceramicists. The cake stand is from Bridget Bodenham and the plates are from Kinfolk & Co. Both items were purchased quite a few years ago and given their handmade nature may not be available any longer, but I’m sure you will find many other gorgeous pieces in their online shops.

      Kind regards,
      Salma

      Reply

Leave a Reply Cancel reply

Your email address will not be published. Required fields are marked *

Recipe rating ★☆ ★☆ ★☆ ★☆ ★☆

This site uses Akismet to reduce spam. Learn how your comment data is processed.

Primary Sidebar

Welcome!

Salma Sabdia | Food Photography

Hi, I’m Salma, and I love creating beautiful images and sweet treats. If you’re looking for a little baking inspiration, you’ve come to the right place.

SaveSave

  • Bloglovin
  • Facebook
  • Instagram
  • Pinterest

Instagram

Still pinching myself that my recipes and images a Still pinching myself that my recipes and images are published on the Marimekko website 🥰

As soon as I laid eyes on this season’s Peura print & hues, I had a vision of the flavour profile I wanted to create. It ended up taking multiple rounds of recipe testing, and many food styling tweaks, but in the end this Coconut Ginger Panna Cotta + Strawberry & Black Sesame came together ❤️

It’s one of those desserts that can be prepared in advance and easily assembled when ready to serve. And the light creamy coconut texture paired with ginger syrup and fresh strawberries is the perfect way to end a heavy holiday feast 😊

Recipe on the @marimekkoaustralia website (linked in profile) and very humbled to have it shared by @marimekko worldwide 🥰

#coconutdessert #coconutpannacotta #summerbaking #holidaybaking #summerdessert #holidaydessert #marimekko #marimekkoaustralia #australianfoodphotographer #foodphotographyandstyling
As the summer approaches, I can’t help but be re As the summer approaches, I can’t help but be reminded of this divine Honey Lavender Ice Cream I created almost a year ago, inspired after my visit to the @hunterlavenderfarm.

I love it flecked with homemade honeycomb and chocolate chips, and have included this variation in the recipe, but you can always opt for the classic smoother texture if you prefer (swipe to the last image to see it simply drizzled with honey and sprinkled with lavender to serve!) 💕

Recipe on the blog | Link in profile

#honeylavender #homemadehoneycomb #honeycomblavender #honeyicecream #lavendericecream #homemadeicecream #icecreamrecipe #foodphotographyandstyling
Just a little sprinkle of sugar to sweeten your da Just a little sprinkle of sugar to sweeten your day 💕

An outtake from my current holiday campaign for @marimekkoaustralia & @marimekko 😊 I shot so many images of these pavlovas that they couldn’t all be included 😂 but this little video seemed so lovely I had to share! 

Raspberry & Roasted Almond Spiced Pavlovas on the @marimekkoaustralia website | Recipe link in profile

#raspberrydessert #raspberryalmond #spiced #minimeringues #minipavlova #holidaybaking #festivebaking #unikko #marimekko #marimekkoaustralia
The one my sister called “A study in contrasts”.

I call it “light and shadow play”.

The way the soft yet direct natural light catches the detail of the glassware. The way the curtains cast repetitive shadow lines across the scene. The way the golden almond stripes mirror the patterned ceramics.

In its most complex form, it’s layers and textures playing and celebrating their little dance of light and shadow. 

And in its simplest form, it is a effortless delicious recipe that will leave you wanting just one more..

Sour Cherry Chocolate & Almond Shortbread
Created for @marimekkoaustralia & @marimekko
A celebration of the Tilliskivi print

Recipe link in profile
A few more favourites from last month’s Pink Rib A few more favourites from last month’s Pink Ribbon event.

A beautiful afternoon at Libby’s charming @pappasvens apartment, spent in the company of a lovely group of women.

A selection of much-loved pink recipes from the blog were baked, and the pink gingerbread hearts won over many hearts themselves. Glasses of lingonberry refreshed our minds, and steaming cups of Nordic tea warmed our souls. And the room was filled with stories, laughter and smiles.

Thank you Libby and all our dear guests for helping making our @nbcfaus event so special, and proudly raising $3000 for breast cancer research 💕

#pinkribbonbreakfast #pinkribbon #fundraiserevent #breastcancerawarenessmonth #nbcf #nbcfaus #pappasven #pinkcakes
Exciting things are happening! It’s been a rath Exciting things are happening!

It’s been a rather slow process but my new website is almost here and I can’t wait to share it with you all so soon 😊

There’s gorgeous new branding by the very talented Erin @littlesisterstudio, my first mailing list (yes it took this long!) and it’s finally going to all be happening in one neat place.. www.salmasabdia.com 😊

But for now, if this image has you craving rosewater panna cotta, you can still find it up on the blog | Link in profile

#rosewater #rosepannacotta #pannacotta #weekendbaking #foodphotographyandstyling #australianfoodphotographer
Lighter moments with the darkest chocolate gelato. Lighter moments with the darkest chocolate gelato. In a glass. With a silver spoon. And salty sea air.

Shot for @estabar_

#chocolategelato #chocolateicecream #estabar #newcastlecafe #newcastleeats #newcastlephotographer #australianphotographer #foodphotographer #foodphotographyandstyling
Sunday sweetness 🤎 ⠀⠀⠀⠀⠀⠀⠀⠀⠀ Sunday sweetness 🤎
⠀⠀⠀⠀⠀⠀⠀⠀⠀
The recipe for these Sour Cherry & Chocolate Heart Crust Buns is linked in my profile. An oldie but a goodie. Especially if you need a little bit of extra love this week 🤎

#holidaybaking #weekendbaking #bakingbuns #sourcherry #chocolatebuns #heartcrustbuns #breadtherapy #foodphotographyandstyling
I’m absolutely delighted to finally share these I’m absolutely delighted to finally share these images and this recipe with you all!

I’ve had the pleasure of creating a series of four very special recipes to showcase the stunning @marimekkoaustralia holiday homeware collections this year, and this dessert is one of my favourites ❤️

Here’s a little bit about my inspiration for this lovely recipe:

“This quintessential Australian dessert gets the luxury treatment this holiday season, showcasing an abundance of fresh raspberries paired with soft spicy toffee notes of molasses, almond and cardamom. Inspired by this season’s Unikko palette of rich reds, earthy browns and flecks of gold, this humble Australian icon seems perfectly at home amongst the stylish Scandinavian servingware. A true indulgence of crisp fragrant meringue shells giving way to soft marshmallowy interiors among pillows of raspberries and cream; a true indulgence best enjoyed in the company of loved ones.

Find the recipe on the @marimekkoaustralia website or linked in my bio ❤️

#marimekko #marimekkoaustralia #unikko #holidaybaking #summerbaking #raspberrypavlova #pavlova #pavlovarecipe #foodphotographyandstyling
Follow @thepolkadotter on Instagram

Latest Blog Posts

Sour Cherry & Chocolate Heart Crust Buns
Roasted Plum Swirl Ice Cream | The Polka Dotter
Blackberry & Chocolate Cupcakes | The Polka Dotter
Honey Lavender Ice Cream | The Polka Dotter
Rosewater Panna Cotta + Fresh Figs | The Polka Dotter
Chocolate Macadamia Black Sesame Cake | The Polka Dotter
strawberry-macadamia-mango-ice-cream-terrine
gingerbread-cookies-with-lemon-icing
macadamia-gingerbread-raspberry-trifle

Copyright © 2023 · Foodie Pro & The Genesis Framework